Tenant Access
With tenant access you give individual tenants a read-only consumption overview for exactly one meter — straight from the cloud portal. The tenant does not need their own account: they simply sign in with their email address and a one-time code (OTP) and see the meter reading, consumption and costs of their rental unit.
This guide as a PDF
For printing and handing out, this guide is also available as a PDF: Deutsch · English
Screenshots
The screenshots on this page show the German portal interface. The portal is fully available in English — the layout is identical.
The two entry points at a glance
| Who | URL | Sign-in |
|---|---|---|
| Landlord (you) | login.wattwächter.de | Your cloud portal account |
| Tenant | login.wattwächter.de/tenant-login.html | Email address + 6-digit one-time code (OTP), no account needed |
As the landlord you manage access in the cloud portal under Tenant Access. The tenant uses a separate, reduced view (“Consumption Overview”) — they never see your portal, your devices or your settings.
Requirements
- A WattWächter Plus connected to your portal account via cloud pairing
- The booked tenant access add-on package (see below)
- For cost figures in the tenant view: an electricity tariff configured for the device (in the portal under device settings → Electricity Tariffs, energy price + standing charge). Without a tariff the tenant only sees kWh values, no € amounts.
Paid add-on package
Tenant access is a paid add-on package and not part of the free cloud portal — from €1.99 per month per device (billed annually, as of August 2026), with the first 3 months free for testing. All details and booking are on the Landlords / B2B page in the shop.
As long as the package is not booked, the Tenant Access entry does not appear in your portal's navigation at all.
Inviting a tenant
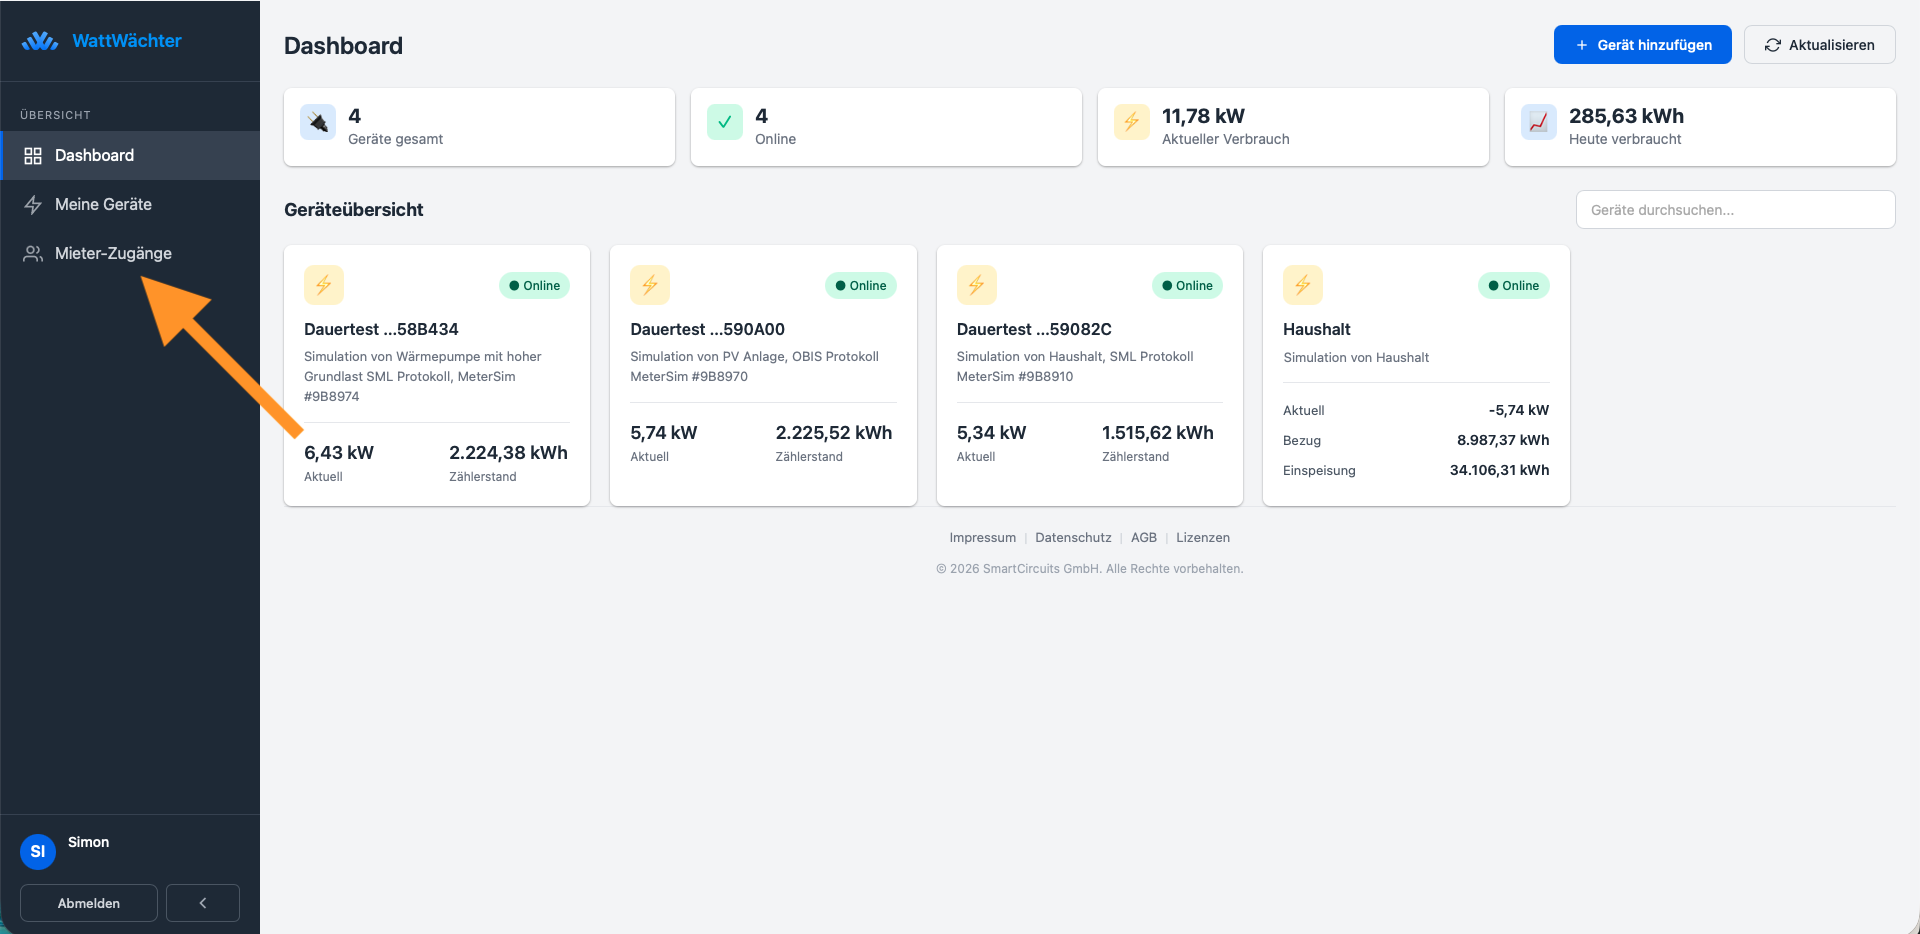
Step 1: Open Tenant Access
In the cloud portal, click Tenant Access in the left-hand navigation:
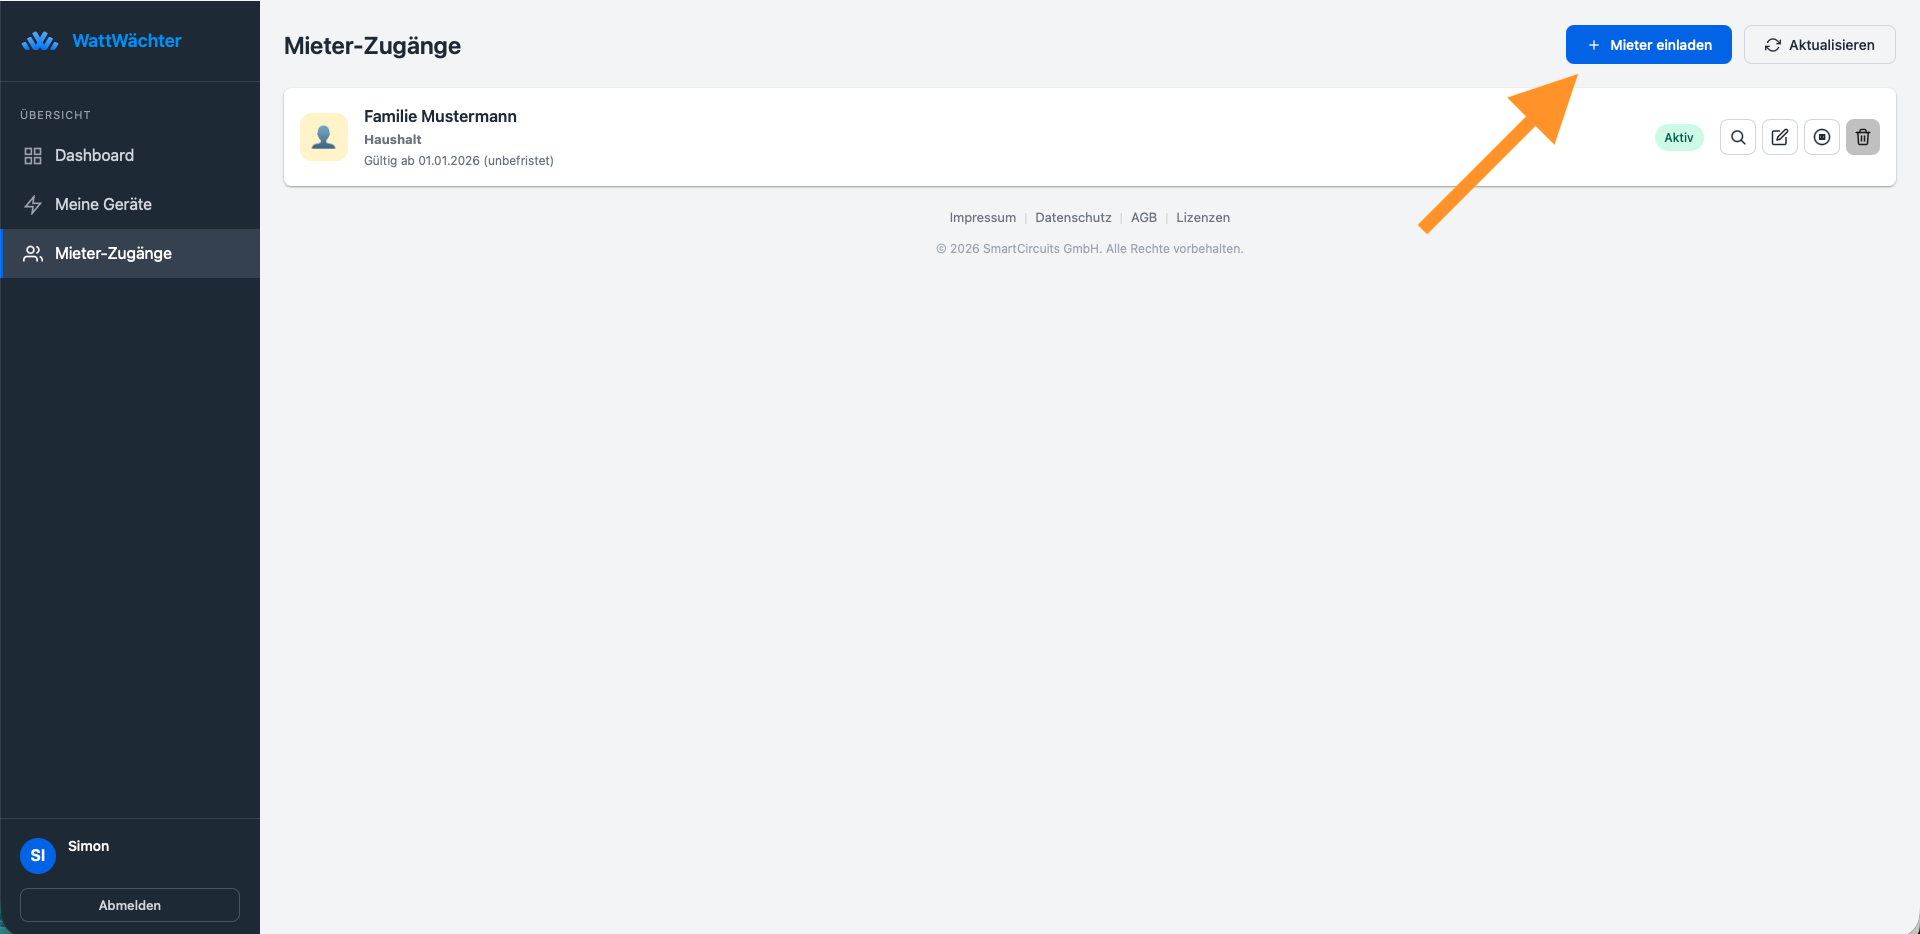
Step 2: Click “Invite Tenant”
Click Invite Tenant in the top right — the invitation dialog opens:
Step 3: Fill in the dialog
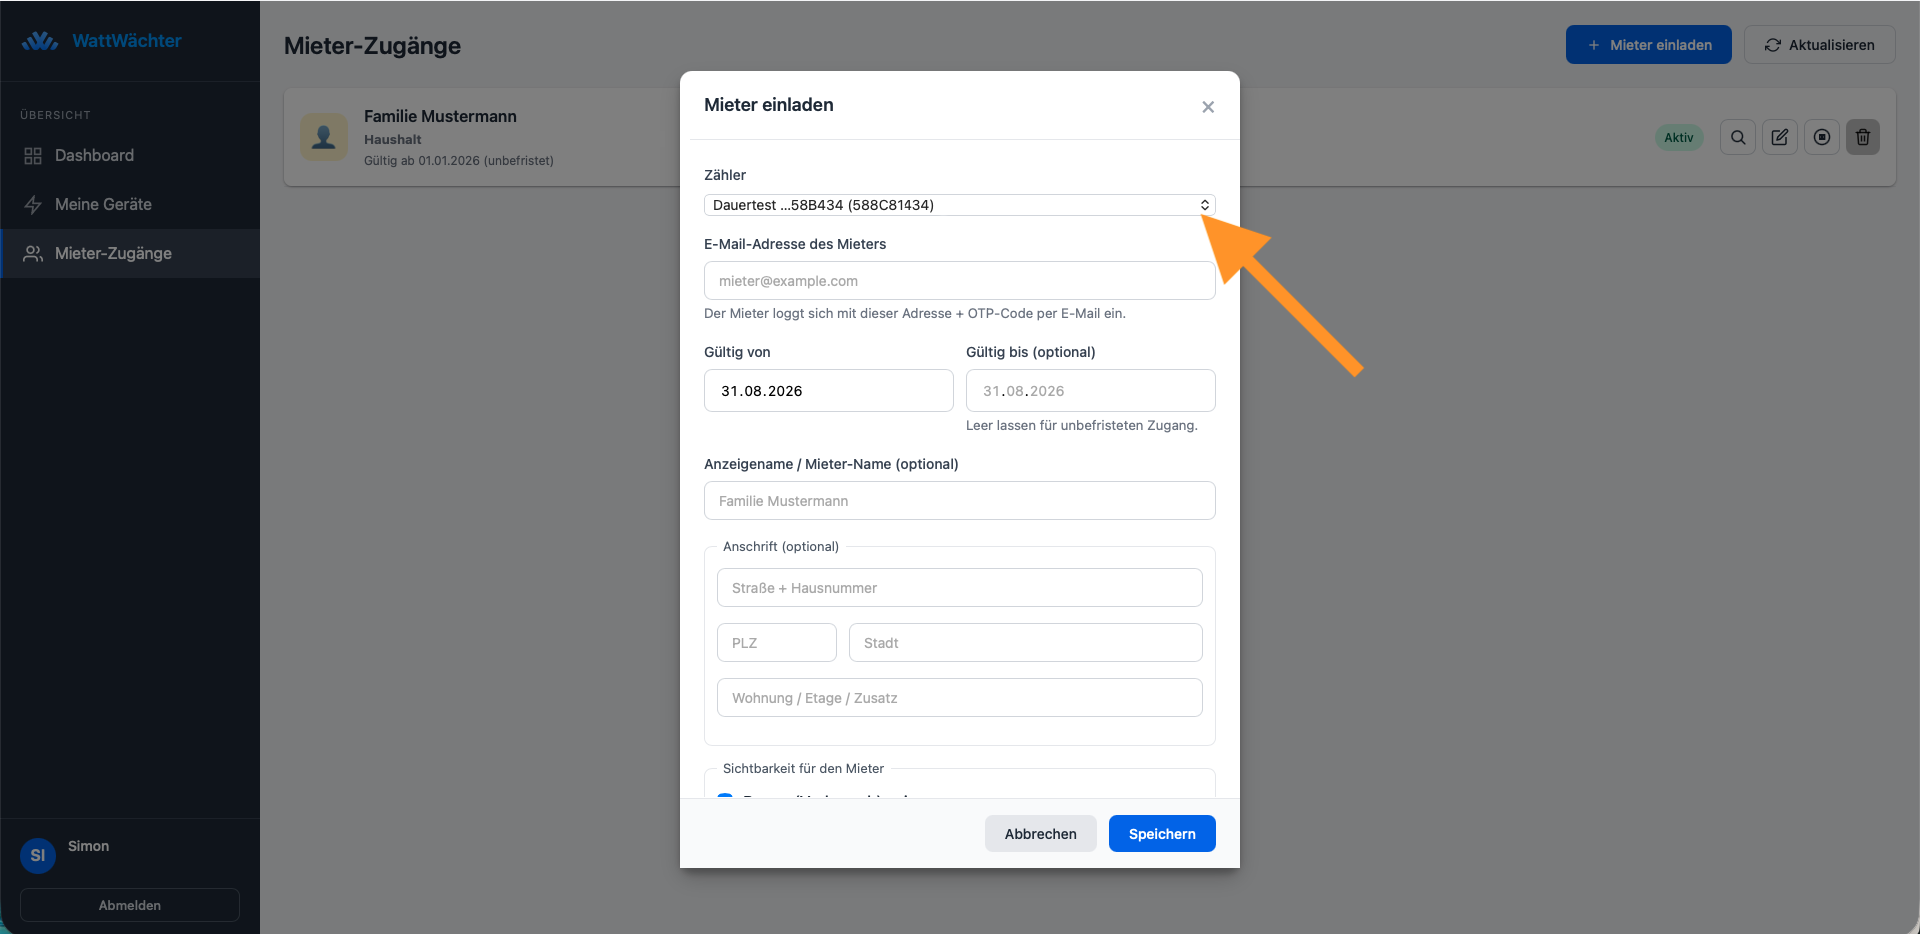
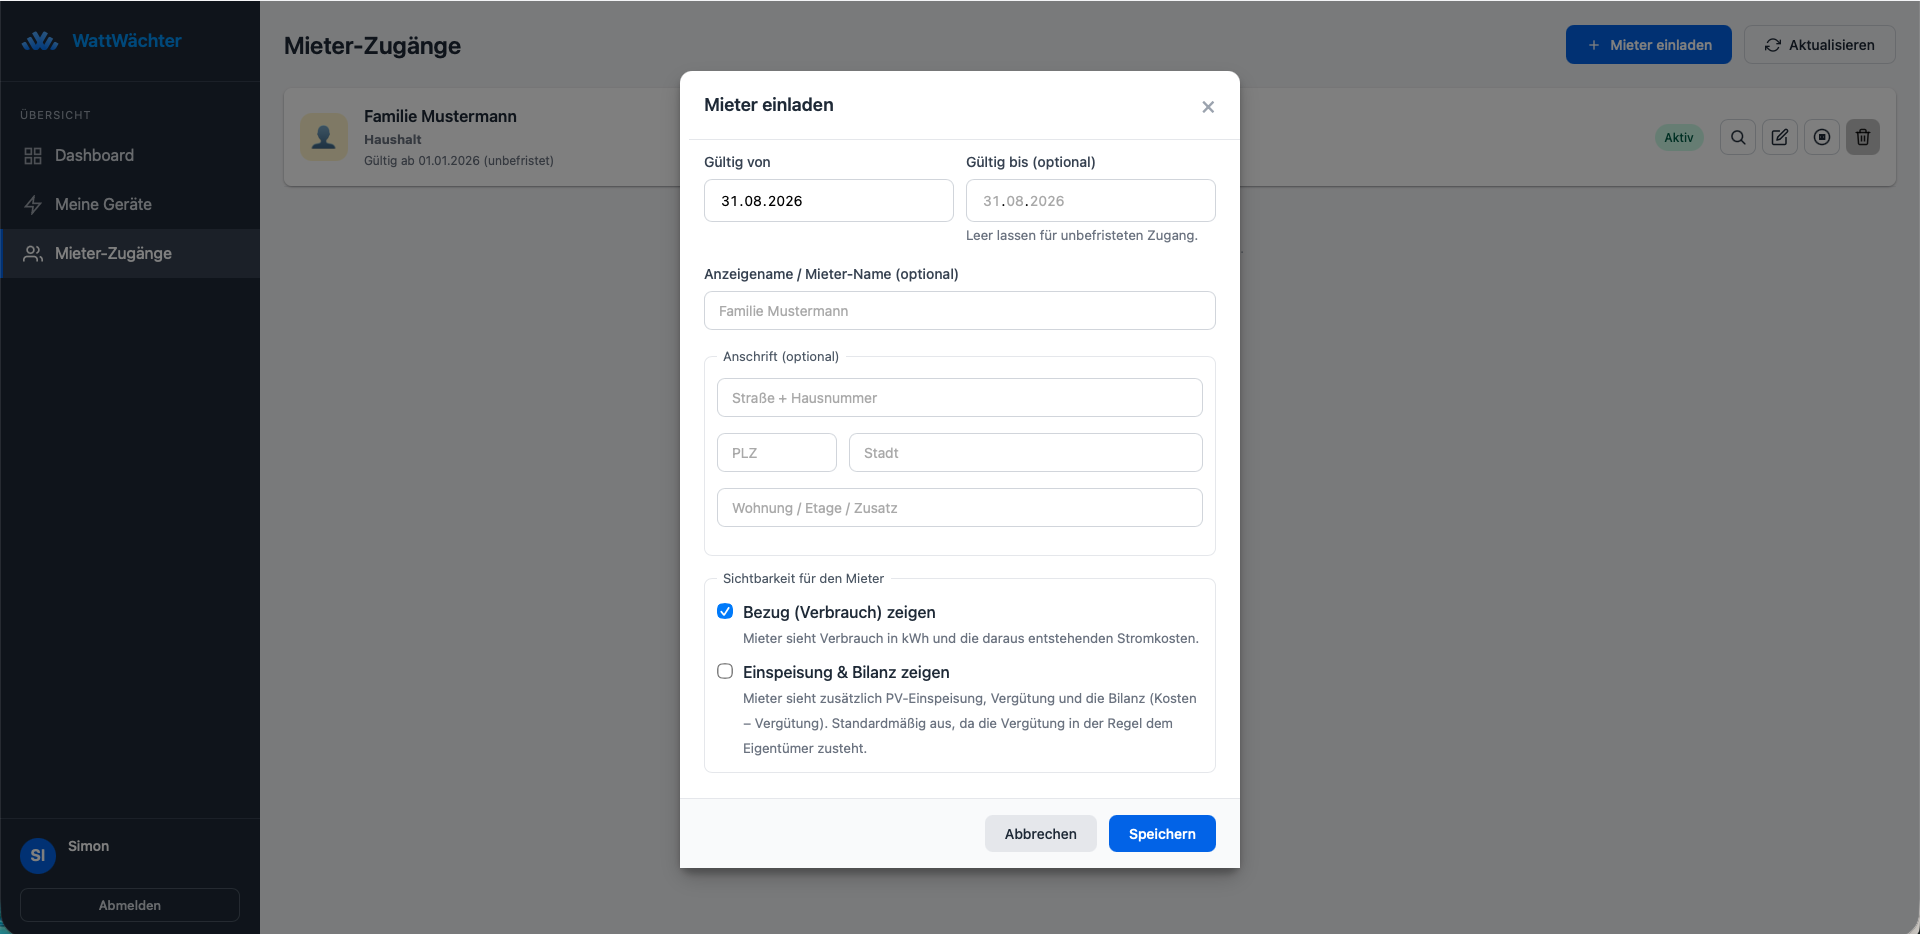
The fields in detail:
| Field | Meaning |
|---|---|
| Meter | The WattWächter whose values the tenant should see. The dropdown shows the device name and device ID. Only your own devices are listed — devices shared with you are not. The meter cannot be changed later. |
| Tenant email address | Required. The tenant signs in with this address — the invitation and login codes are sent to it. The address cannot be changed later; if you mistyped it, delete the access and create it again. |
| Valid from | Start of access, pre-filled with today's date. Backdating is allowed (e.g. if the tenant has already moved in) — the tenant then also sees the values since that date. Future dates are limited to 6 months ahead; before the start date the tenant cannot sign in yet (status “Scheduled”). |
| Valid until (optional) | End of access, e.g. the move-out date. Leave empty for open-ended access. After the end date the status changes to “Expired” and the tenant can no longer access the data. |
| Display name (optional) | E.g. “Mustermann family”. Shown in your access list and in the tenant's header. Without a display name the email address is shown instead. |
| Address (optional) | Street + number, postal code, city, and apartment / floor / extra line. Shown in the tenant's overview and helps you keep track when you manage several units. |
| Show consumption (import) | Default: on. The tenant sees their consumption in kWh and the resulting electricity cost. |
| Show feed-in & balance | Default: off. The tenant additionally sees PV feed-in, feed-in revenue and the net balance (cost − revenue). Off by default since feed-in revenue typically belongs to the landlord. |
Both checkboxes cleared?
If neither “consumption” nor “feed-in & balance” is checked, the dialog warns: “With this selection the tenant will see no values at all — the page stays empty.”
Step 4: Save
Click Save to create the access. The tenant automatically receives an invitation email (subject: “Verbrauchsübersicht für ‹meter name› freigeschaltet”) with a link to the consumption overview on which their email address is already pre-filled.
Limits
Up to 20 active tenant accesses per device — including several accesses for the same email address (e.g. for different meters).
How the tenant signs in (OTP login)
The tenant needs no account and no password — sign-in works with a one-time code (OTP = one-time password) sent by email:
- Open the invitation — click “Zur Verbrauchsübersicht” in the invitation email. The login page opens with the email address pre-filled. (Alternatively, open login.wattwächter.de/tenant-login.html at any time and type the email address.)
- Click “Request Code” — the tenant receives a 6-digit code by email. The code is valid for 10 minutes.
- Enter the code — as soon as all 6 digits are typed (or pasted), the page signs in automatically.
- Done — the consumption overview opens. The session stays valid for 6 months; after that, the tenant simply requests a new code.
Good to know:
- After 5 wrong entries the code is locked — just request a new one.
- A new code can be requested at the earliest 30 seconds after the last one.
- A code is only sent if an active access exists for that address. For “Scheduled”, “Expired” or “Deactivated” no email is sent — for privacy reasons the login page never reveals whether an address has access.
What the tenant sees
The tenant's consumption overview is a pure read-only view of the shared meter:
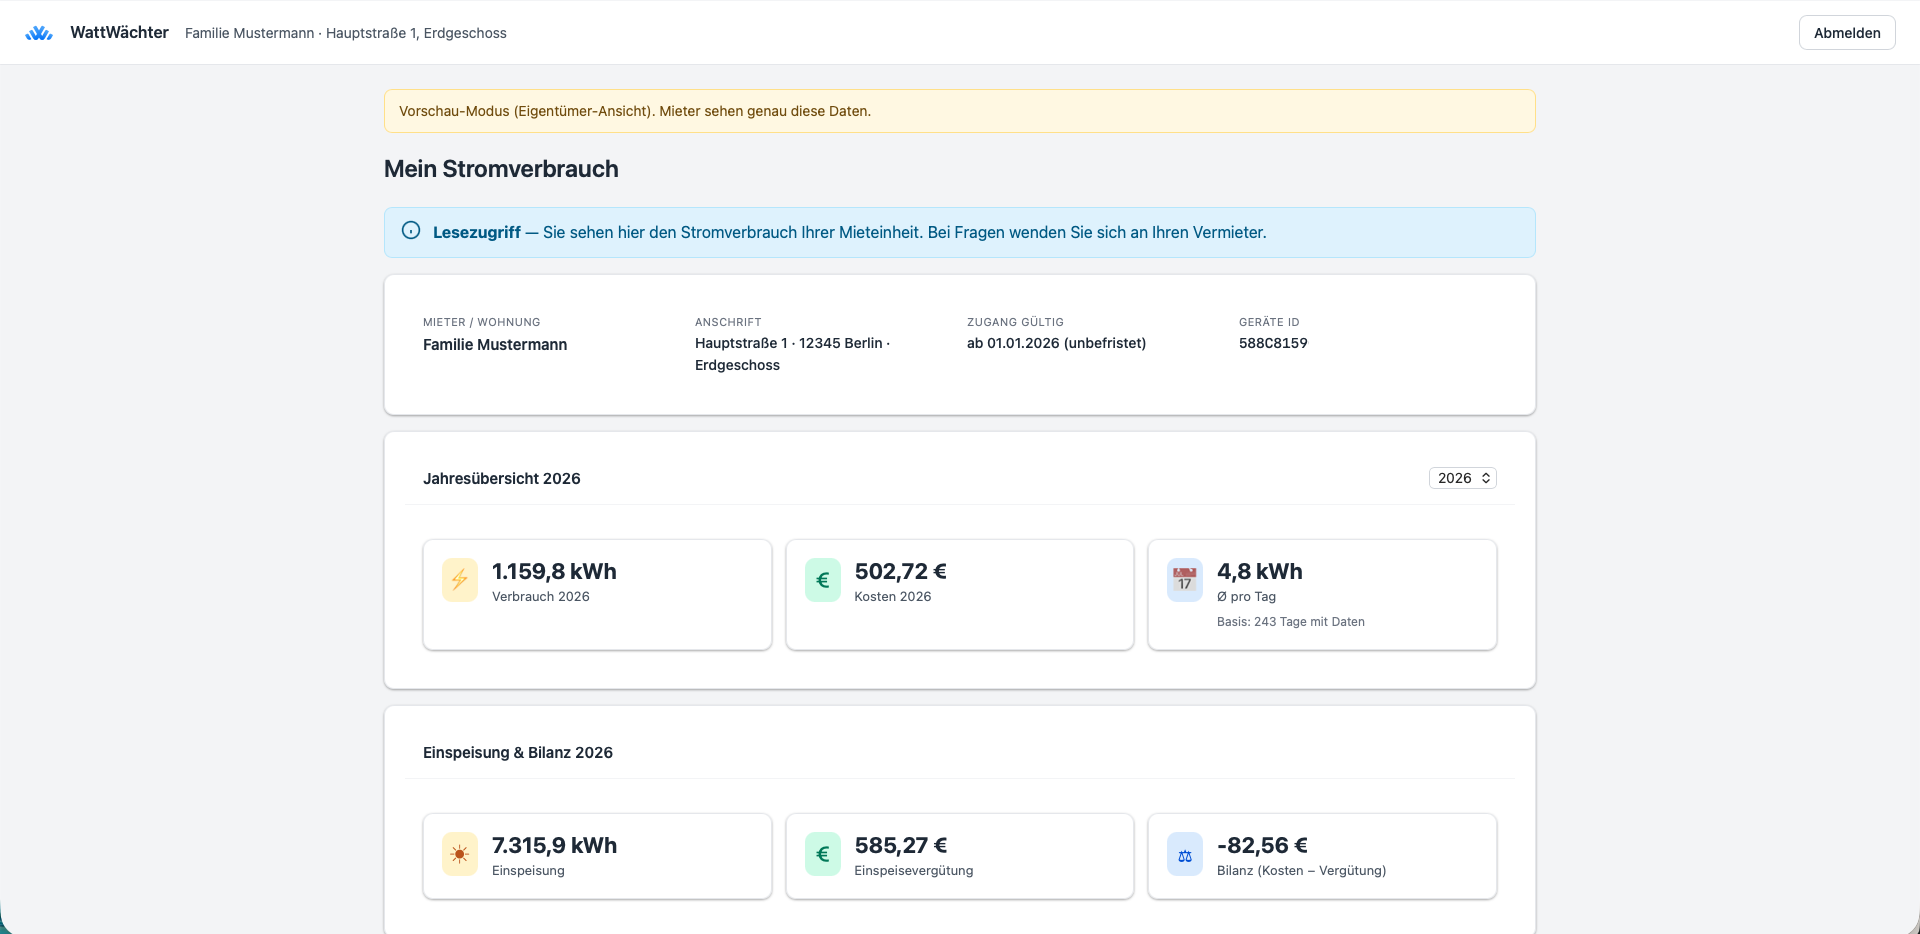
- Header — tenant/unit, address, access validity and the device ID of the meter, plus a “read access” notice.
- Yearly summary — consumption (kWh), electricity cost (€) and average consumption per day, with the year selectable from a dropdown.
- Feed-in & balance — only visible if you enabled “Show feed-in & balance”: PV feed-in (kWh), feed-in revenue (€) and the balance (cost − revenue).
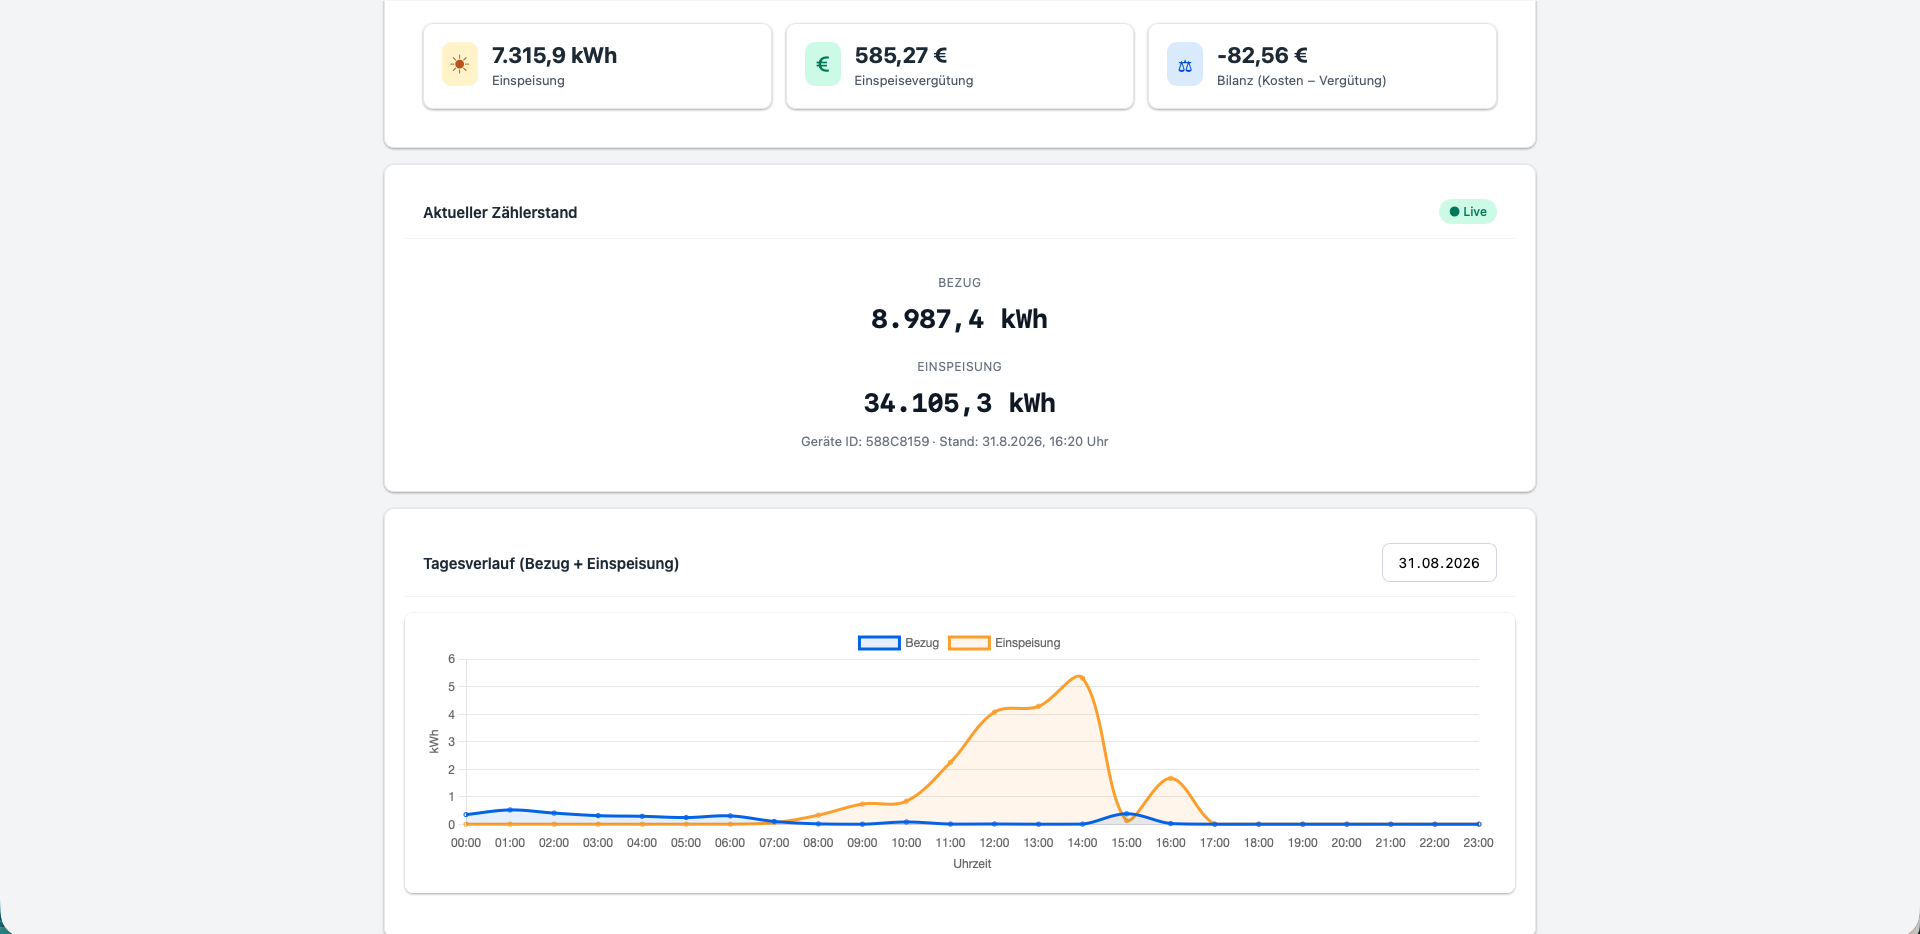
- Current meter reading — import and, if applicable, export in kWh, live from the device with a timestamp.
- Daily profile — hourly curve for a selectable day.
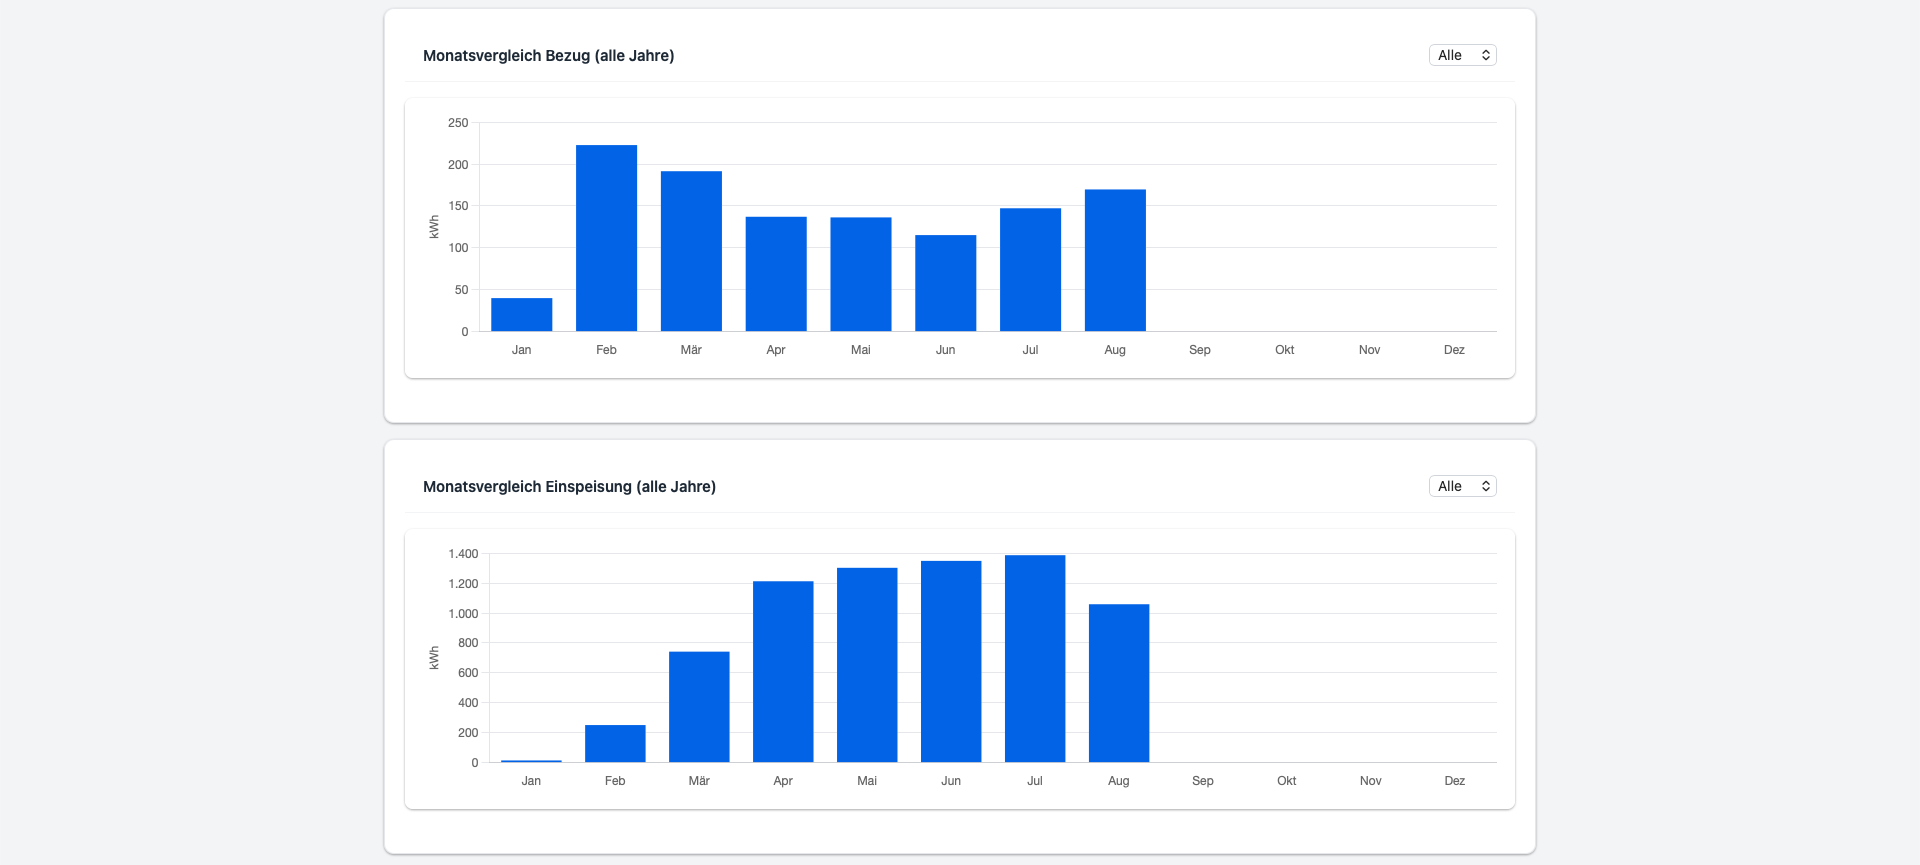
- Monthly comparison — bar charts of the monthly values, for one year or all years.
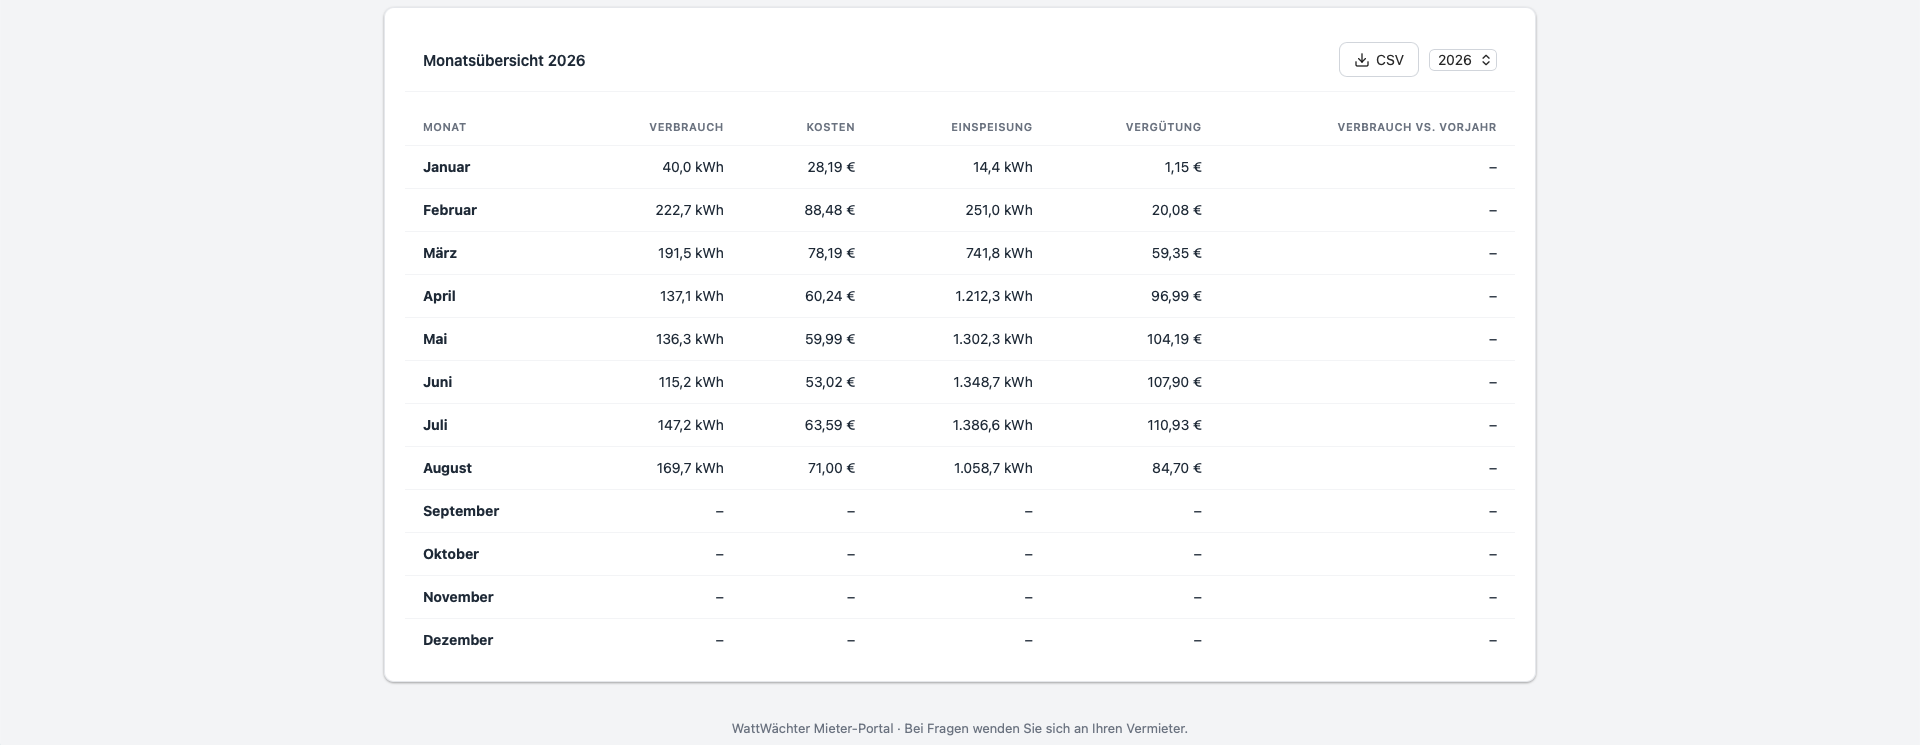
- Monthly overview — table with consumption, cost, feed-in and revenue per month, including CSV export (e.g. for the utility bill).
The € amounts are calculated from the electricity tariffs you configured in the portal's device settings. The tenant cannot change anything: no settings, no tariffs, no other devices.
Preview: checking the tenant view
The magnifier icon opens the consumption overview exactly as the tenant sees it — including the chosen visibility:

A yellow banner marks it as the owner's preview: “Preview mode (owner view). Tenants see exactly this data.” The preview session is valid for 1 hour and does not affect the tenant's own sign-in.
Managing access
The list under Tenant Access shows every access with name, meter, address, validity and status:

Status
The colored status badge on the right of each entry shows at a glance whether the access is currently usable:
| Status | Meaning |
|---|---|
| Active | The tenant can sign in and see data. |
| Scheduled | “Valid from” is in the future — no access yet. |
| Expired | “Valid until” has passed — no more access. |
| Deactivated | Manually deactivated by you — no access until you reactivate. |
Editing
The pencil icon lets you change validity, display name, address and visibility. Only the meter and the email address are fixed — for those, delete the access and create it again.

Deactivating and reactivating
The pause icon deactivates an access: the tenant loses access immediately (even an existing session no longer sees data), but the entry stays in the list with all its settings.

A deactivated access can be reactivated at any time with the play icon — the tenant can sign in again right away. Deactivating and reactivating are meant for temporarily blocking the same tenant. They do not help with a tenant change, since the email address is fixed to the access: delete the old access and create a new one for the new tenant's address.

Deleting
The trash icon removes the access permanently — including the stored tenant data, e.g. after a tenant has moved out. This cannot be undone; for a temporary block, deactivate instead.

Privacy
- The tenant has read-only access to the values you shared for exactly one meter — no settings, no device management, no other devices.
- Feed-in and balance figures are only visible if you explicitly share them.
- When an access expires or is deactivated, data access is blocked immediately — regardless of whether the tenant is still signed in.
- Sign-in works without a password, using one-time codes sent to the email address you entered; the login page never reveals which addresses have access.