Settings
Most device settings can be changed via four different paths:
- Web interface — Local UI directly on the device, reachable at
http://wattwaechter-XXXXXXXXXXXX.localfrom the same network - Smartphone app — iOS & Android (the same app used for initial setup)
- Cloud Portal — Remote access via login.wattwächter.de
- REST API — Directly over HTTP, with all technical details and JSON schemas
What does XXXXXXXXXXXX mean?
The twelve X's represent your WattWächter's individual device ID (the last 12 characters of its MAC address, hexadecimal). You can find it e.g. in the Cloud Portal or in the app.
This page explains what the individual settings do — in the order they appear on the Settings page of the web interface. The concrete JSON fields, endpoints and the full schema are documented in the REST API reference.
Remember to save
In the web interface each section expands individually. Changes only take effect once you press Save at the bottom of the page; Reset reloads the stored state. While something is unsaved, the bar shows "Unsaved changes" and the browser warns you before leaving the page.
Device
| Setting | Description |
|---|---|
| Device name | Free-form name (max. 31 characters) shown for the device in the app and in the Cloud Portal. The local hostname wattwaechter-XXXXXXXXXXXX.local is not affected. |
| Status LED | Turns the status LED on the device on or off |
Status LED
The multicolor status LED on the device shows the current connection and error state (see LED status). It can be turned off entirely, e.g. if the device is operated in a bedroom.
API keys: device_name, ledEnable — see REST API reference.
WiFi
Connection to your home network. The WattWächter automatically connects to the stored WiFi on every boot. The badge next to the heading shows whether the connection is currently up.
There are two WiFi profiles: the primary WiFi and an optional secondary WiFi. On boot the device tries the primary network first and only falls back to the secondary one if the primary is not reachable — handy for a second network at the same site or when moving the device.
Per profile:
| Setting | Description |
|---|---|
| SSID | Name of the WiFi network (2.4 GHz) |
| Password | WiFi password (WPA2), max. 63 bytes. Leave empty to keep the stored password. A counter below the field shows the length and warns about leading or trailing whitespace — a typical artefact of pasting from mail or a password manager. |
| Static IP address | Bypasses DHCP. Only use it if your router does not hand out a reliable IP. The toggle reveals the fields IP address, Subnet mask, Gateway and DNS server (empty = the gateway is used as DNS). IP, subnet and gateway are mandatory; invalid entries are rejected on save. |
Changing the SSID without a new password
If you change the SSID but leave the password empty, saving asks for confirmation: the previously stored password is then reused for the new network. That only makes sense for fixing a typo in the SSID — a different network usually needs a different password.
Fixed IP for Modbus clients
Loxone and other Modbus clients cannot resolve .local names and need a fixed IP. Instead of a static IP on the device, a DHCP reservation in the router is usually the more robust choice — see Modbus TCP.
API keys: wifi.primary, wifi.secondary (each with ssid, password, static_ip, ip, subnet, gateway, dns) — see REST API reference.
Access point
The device can open its own WiFi network — for setup, or when no home WiFi is available.
Without any configuration the access point behaves like this:
- If no WiFi is configured (factory state, after a factory reset), the access point is always on.
- After a cold start (power applied) it runs alongside the home WiFi for 15 minutes and shuts down if nobody connects during that time. It does not start after a software restart (e.g. the nightly update check).
| Setting | Description |
|---|---|
| Enable access point | Keeps the access point on permanently — it no longer shuts down due to inactivity |
| SSID | Name of the network. Leave empty for the automatic name WattWaechter-Plus-XXXXXX (X = last six characters of the MAC address) |
| Password protection | Secures the access point with WPA2. Without it, the network is open. |
| Password | At least 8 characters. If you enable password protection without entering a password, the web interface asks for confirmation — otherwise the access point starts unprotected. |
IP address on the access point network
On the access point's network the web interface is reachable at http://192.168.4.1 — see Setup.
API keys: accessPoint.enable, accessPoint.ssid, accessPoint.password_enable, accessPoint.password — see REST API reference.
API security
By default, the local REST API is reachable without a token to keep initial setup as simple as possible. On shared networks, we recommend enabling token-based authentication.
| Setting | Description |
|---|---|
| API authentication required | Without a valid token, no API access is possible — this also applies to the web interface and the app on the local network, which then need the token. |
| Regenerate tokens… | Starts the token rotation (step 1 of 2). The new tokens only become active once they are confirmed via the API within 60 seconds — see Authentication. |
When enabled, there are two token levels:
- READ token — Read data (history, status, view settings)
- WRITE token — Change settings, start OTA updates, trigger reboot
Tokens are renewed via a two-phase process to prevent accidental lockout.
Recommendation
Enable authentication when the device is operated on a shared network or the REST API could be reachable by third parties.
API keys: api_auth_required (activation), /api/v1/auth/tokens/* (token rotation) — see REST API reference.
Time & language
| Setting | Description |
|---|---|
| Time zone | Chosen from the device's time zone list (default: Europe/Berlin). Determines all local times — timestamps of the history data, day and month boundaries of the statistics, the time of the nightly update check. Daylight saving time is handled automatically. |
| Language | Deutsch or English (default: German). Affects the texts the device itself generates: the labels of the readings in the API (e.g. "Active energy import" instead of "Wirkenergie Bezug") and in the entity names of the Home Assistant auto-discovery via MQTT, as well as system texts such as the uptime. The web interface itself is not affected. |
| NTP server | Time server for the device clock (default: pool.ntp.org). If it is unreachable, the device automatically falls back to built-in backup servers (time.nist.gov, time.google.com). On a company network without internet access, enter your internal time server here. |
Language and MQTT discovery
The entity names for Home Assistant are published when the device connects to the broker. After a language change the new names apply from the next MQTT connection (restart or reconnect); entities that already exist in Home Assistant keep the name they were given.
API keys: timezone, ntp_server, language.active; the time zone list is served by GET /api/v1/system/timezones — see REST API reference.
MQTT
Sends telemetry data to an MQTT broker — for example to integrate with Home Assistant, ioBroker or other smart home systems. Disabled by default.
→ All fields (broker, port, TLS, user/password, topic prefix, publish interval, CA certificate), topic structure, payload format and Home Assistant auto-discovery are documented under Interfaces → MQTT.
Cloud connection
| Setting | Description |
|---|---|
| Enable cloud connection | Connects the device to the WattWächter cloud service. Required for app access away from home, the Cloud Portal and remote diagnostics by support. Switched off, the device works purely locally — web interface, REST API, MQTT and Modbus keep working. |
Pairing with a portal account uses the pairing token — see Cloud Portal → Pairing a device or the Cloud pairing section of the web interface.
API key: awsIotEnabled — see REST API reference.
Modbus TCP
Exposes the current readings as a Modbus TCP server in SunSpec format — e.g. for Loxone, openHAB, evcc or other home automation. Disabled by default.
| Setting | Description |
|---|---|
| Enable Modbus TCP server | Starts the server; it listens on the configured TCP port and serves SunSpec-compliant registers |
| Port | Default 502 — only change it if that port is already taken |
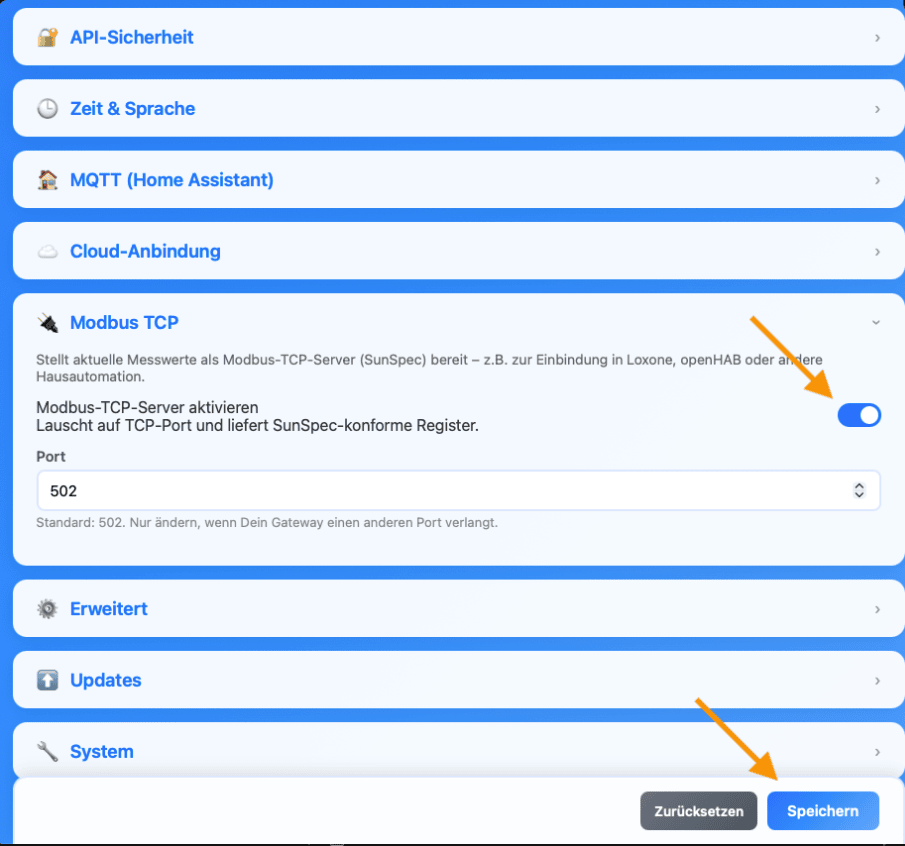
→ Register map, data types, scale factors and example access are documented under Interfaces → Modbus TCP.
Advanced
| Setting | Description |
|---|---|
| Median filter (smoothing) | Filters short-lived outliers from the meter readings before they are passed on. Options: Off, 3, 5 (default), 7 or 9 values. Higher values smooth more strongly but delay the display by that many meter telegrams. The filter applies to all outputs alike — web interface, app, REST API, MQTT, Modbus and cloud. |
| CT ratio (current transformers) | Only for semi-indirect metering via current transformers, e.g. on large supplies: a 250 A / 5 A transformer gives a factor of 50. Currents, powers and energy counters are multiplied by this factor; voltage stays unchanged. Allowed range 1 to 10000 in steps of 0.1; default 1 (direct metering, no conversion). |
The CT ratio applies from the moment you save
Already recorded history data is not converted retroactively. Set the factor right at commissioning, otherwise the history will show a jump.
API keys: medianFilterSize, ctRatio — see REST API reference.
Updates
The WattWächter checks for new firmware versions every night.
| Setting | Description |
|---|---|
| Install updates automatically | With the toggle on (default), an available update is installed right away during the nightly check. Switched off, the device only reports available updates; you start the installation yourself. |
| Start update now… | Checks for an update immediately and installs it if one is available. The process takes 2–3 minutes; the device restarts several times and is unreachable meanwhile. A running update cannot be cancelled. |
→ Update flow, release channels and troubleshooting: Software updates.
API keys: autoOta; GET /api/v1/ota/check, POST /api/v1/ota/start — see REST API reference.
System
| Action | Description |
|---|---|
| Restart | Restarts the device after confirmation. Settings and history data are preserved; the device is unreachable for about half a minute. A software restart does not open the access point — that needs a cold start or the toggle under Access point. |
A factory reset is not available from the web interface — see FAQ → Performing a factory reset.
API key: POST /api/v1/system/reboot — see REST API reference.