Home Assistant
The WattWächter Plus integration for Home Assistant enables seamless integration of your WattWächter Plus into your smart home. All sensor data is automatically detected and provided as entities in Home Assistant.
Now an official part of Home Assistant
As of Home Assistant 2026.7, the WattWächter Plus integration is a built-in part of Home Assistant Core. Installation via HACS is no longer required — the integration is already included and is discovered automatically on your network.
Two ways to Home Assistant
There are two ways to integrate the WattWächter into Home Assistant:
- Native integration (this page) — local meter readings as sensor entities, no cloud. Included in Home Assistant Core as of Home Assistant 2026.7.
- MQTT with auto-discovery — see Interfaces → MQTT. Only as a sensor source.
Use only one of the two at a time, otherwise duplicate entities can appear.
Prerequisites
- WattWächter Plus set up and connected to WiFi — if not yet done, follow the Getting Started guide first
- Home Assistant 2026.7 or newer (the integration was accepted into Home Assistant Core in this release)
- WattWächter Plus on the same network as Home Assistant
Installation
As of Home Assistant 2026.7, the integration is already included in Home Assistant — there is nothing to install. Continue directly with Setting Up the Integration.
Older Home Assistant versions
If you are running a version before 2026.7, see the (deprecated) HACS installation in the "Installation via HACS (deprecated)" section at the end of this page.
Setting Up the Integration
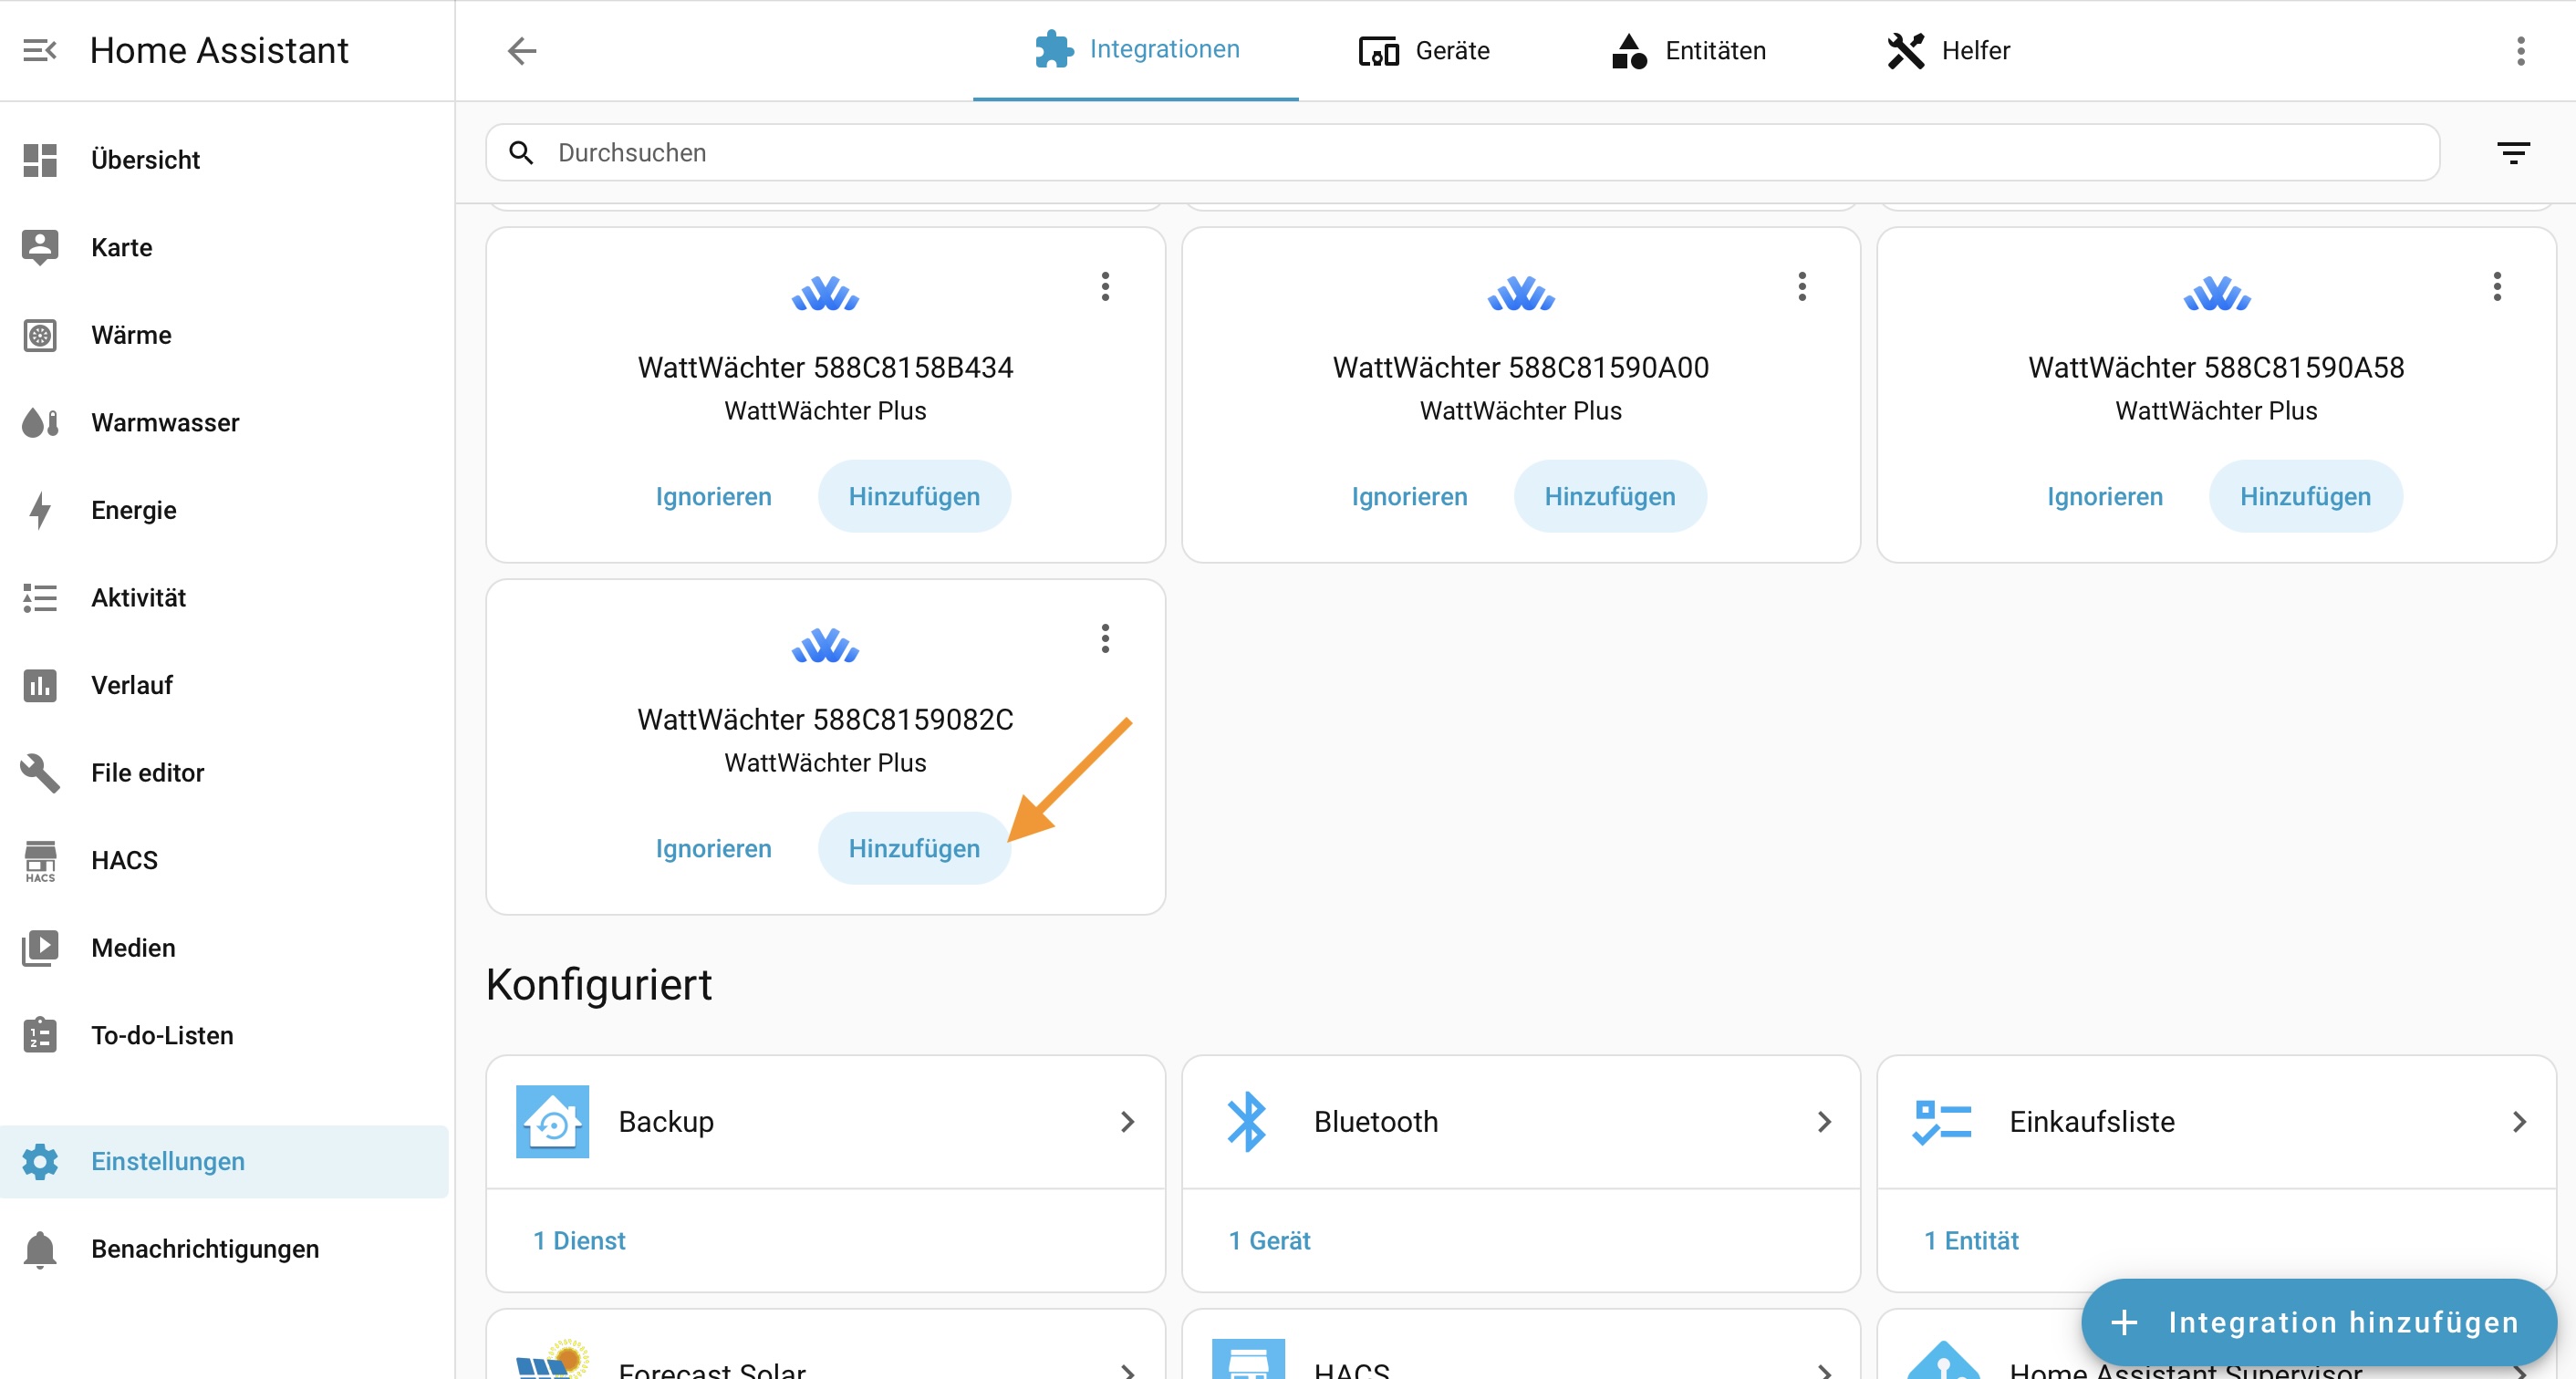
Automatic Discovery (Zeroconf)
Home Assistant automatically detects all WattWächter Plus devices on the network. You can find discovered devices under Settings > Devices & Services in the Discovered section. Click Add to set up a device.
Add Manually
If the device is not discovered automatically (e.g. because mDNS/Zeroconf is blocked on your network), you can add it manually: Settings > Devices & Services > Add Integration > WattWächter Plus. Then enter the hostname or IP address of the device.
Configure Device
The configuration dialog displays the device information:
- Model: WW-Plus
- Firmware: current version
- Host: IP address of the device
- Device ID: unique identifier
Optionally, you can enter an API token to enable authenticated access. Click OK to complete the setup.

Name Your Device
After configuration, you can assign a name and area to the device (e.g., "WattWächter Feed-in" in the area "Basement"). Click Skip and finish if you want to set this up later.

Available Sensors
The integration automatically creates sensors based on the OBIS codes provided by your electricity meter. Which sensors are available depends on your meter.
Energy Sensors
| Sensor | OBIS Code | Unit | Description |
|---|---|---|---|
| Total Consumption | 1.8.0 | kWh | Total energy import |
| Total Feed-in | 2.8.0 | kWh | Total energy export |
| Consumption Tariff 1 | 1.8.1 | kWh | Energy import tariff 1 (peak) |
| Consumption Tariff 2 | 1.8.2 | kWh | Energy import tariff 2 (off-peak) |
| Feed-in Tariff 1 | 2.8.1 | kWh | Energy export tariff 1 |
| Feed-in Tariff 2 | 2.8.2 | kWh | Energy export tariff 2 |
Power Sensors
| Sensor | OBIS Code | Unit | Description |
|---|---|---|---|
| Active Power | 16.7.0 | W | Current total power |
| Power L1 | 36.7.0 | W | Power phase 1 |
| Power L2 | 56.7.0 | W | Power phase 2 |
| Power L3 | 76.7.0 | W | Power phase 3 |
Voltage & Current Sensors
| Sensor | OBIS Code | Unit | Description |
|---|---|---|---|
| Voltage L1/L2/L3 | 32/52/72.7.0 | V | Voltage per phase |
| Current L1/L2/L3 | 31/51/71.7.0 | A | Current per phase |
| Frequency | 14.7.0 | Hz | Grid frequency |
| Power Factor | 13.7.0 | — | Total and per phase |
Known OBIS codes only
The integration creates sensors only for the known OBIS codes listed above. If your electricity meter provides additional codes, they are currently not created automatically as sensors in the Home Assistant Core version.
Which sensors appear depends on your meter
Not every electricity meter provides all OBIS codes. Many meters must also first be unlocked with a PIN from your grid operator before they expose detailed meter data.
Scan Interval
The integration fetches meter data locally every 120 seconds. In the Home Assistant Core version this interval is fixed and currently cannot be changed via the interface.
Firmware Updates
The Home Assistant Core integration does not provide an update entity — firmware updates cannot be started from within Home Assistant. Update the firmware directly via the device web interface or an OTA update instead.
Troubleshooting
Device not automatically discovered
Make sure that:
- The WattWächter Plus is powered on and connected to WiFi
- Home Assistant and the WattWächter are on the same network/subnet
- mDNS/Zeroconf is not blocked in your network (e.g., by VLAN isolation or firewall)
- The device is not connected to a guest WiFi network — guest networks typically prevent communication between devices (client isolation)
You can also add the device manually: Settings > Devices & Services > Add Integration > WattWächter and enter the IP address.
MQTT Conflict
If MQTT auto-discovery is active on the WattWächter, the integration detects this and notifies you. In this case, either disable MQTT auto-discovery on the device or use the MQTT integration instead of the local API integration. Using both simultaneously can lead to duplicate entities.
Authentication Error
If the API token has changed, you can update it via Settings > Devices & Services > WattWächter Plus > Re-authenticate.
Installation via HACS (deprecated)
Only for Home Assistant before 2026.7 — will be removed
As of Home Assistant 2026.7, the integration is included in Home Assistant Core and no longer needs to be installed via HACS. This section is only relevant for older Home Assistant versions and will be removed around October 2026. New installations should use the integration built into Home Assistant (see Installation).
Feature scope
The version included in Home Assistant Core currently provides sensors only (see above) — without an update entity, without a configurable scan interval, and without diagnostic sensors. The custom component installed via HACS may differ.
Prerequisite: HACS (Home Assistant Community Store) installed.
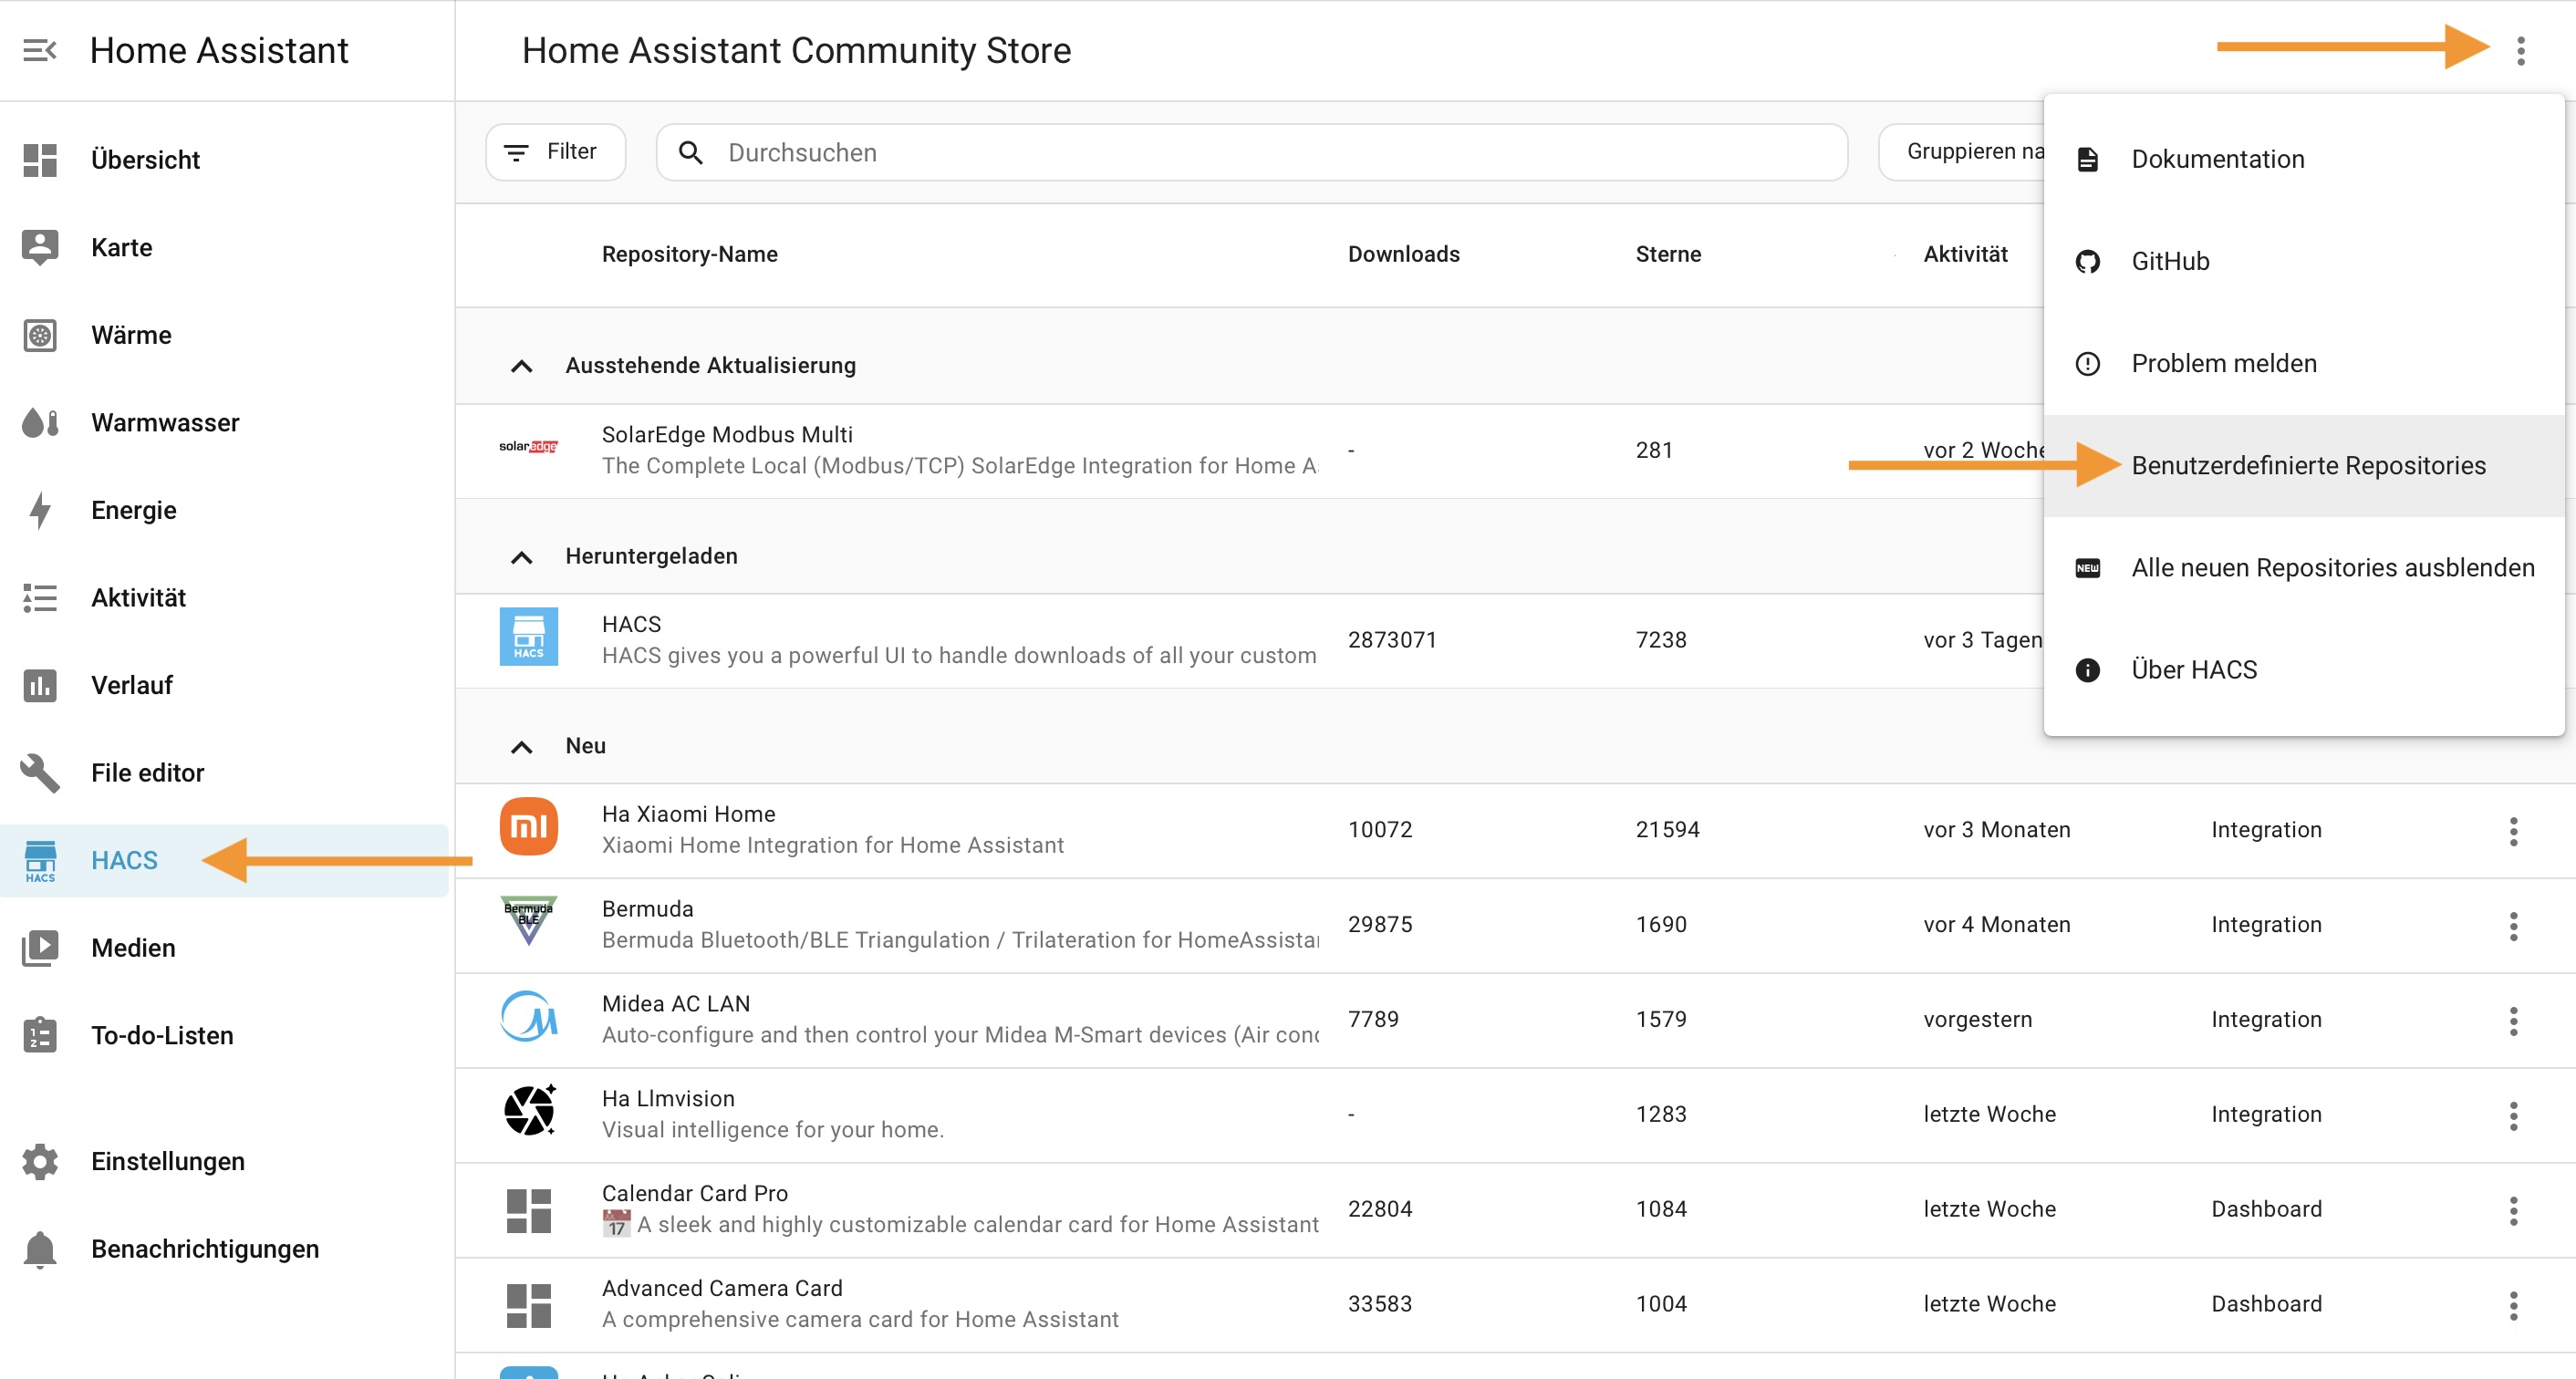
Step 1: Add Custom Repository
Open the Home Assistant sidebar and navigate to HACS. Click the three-dot menu () in the top right corner and select Custom repositories.
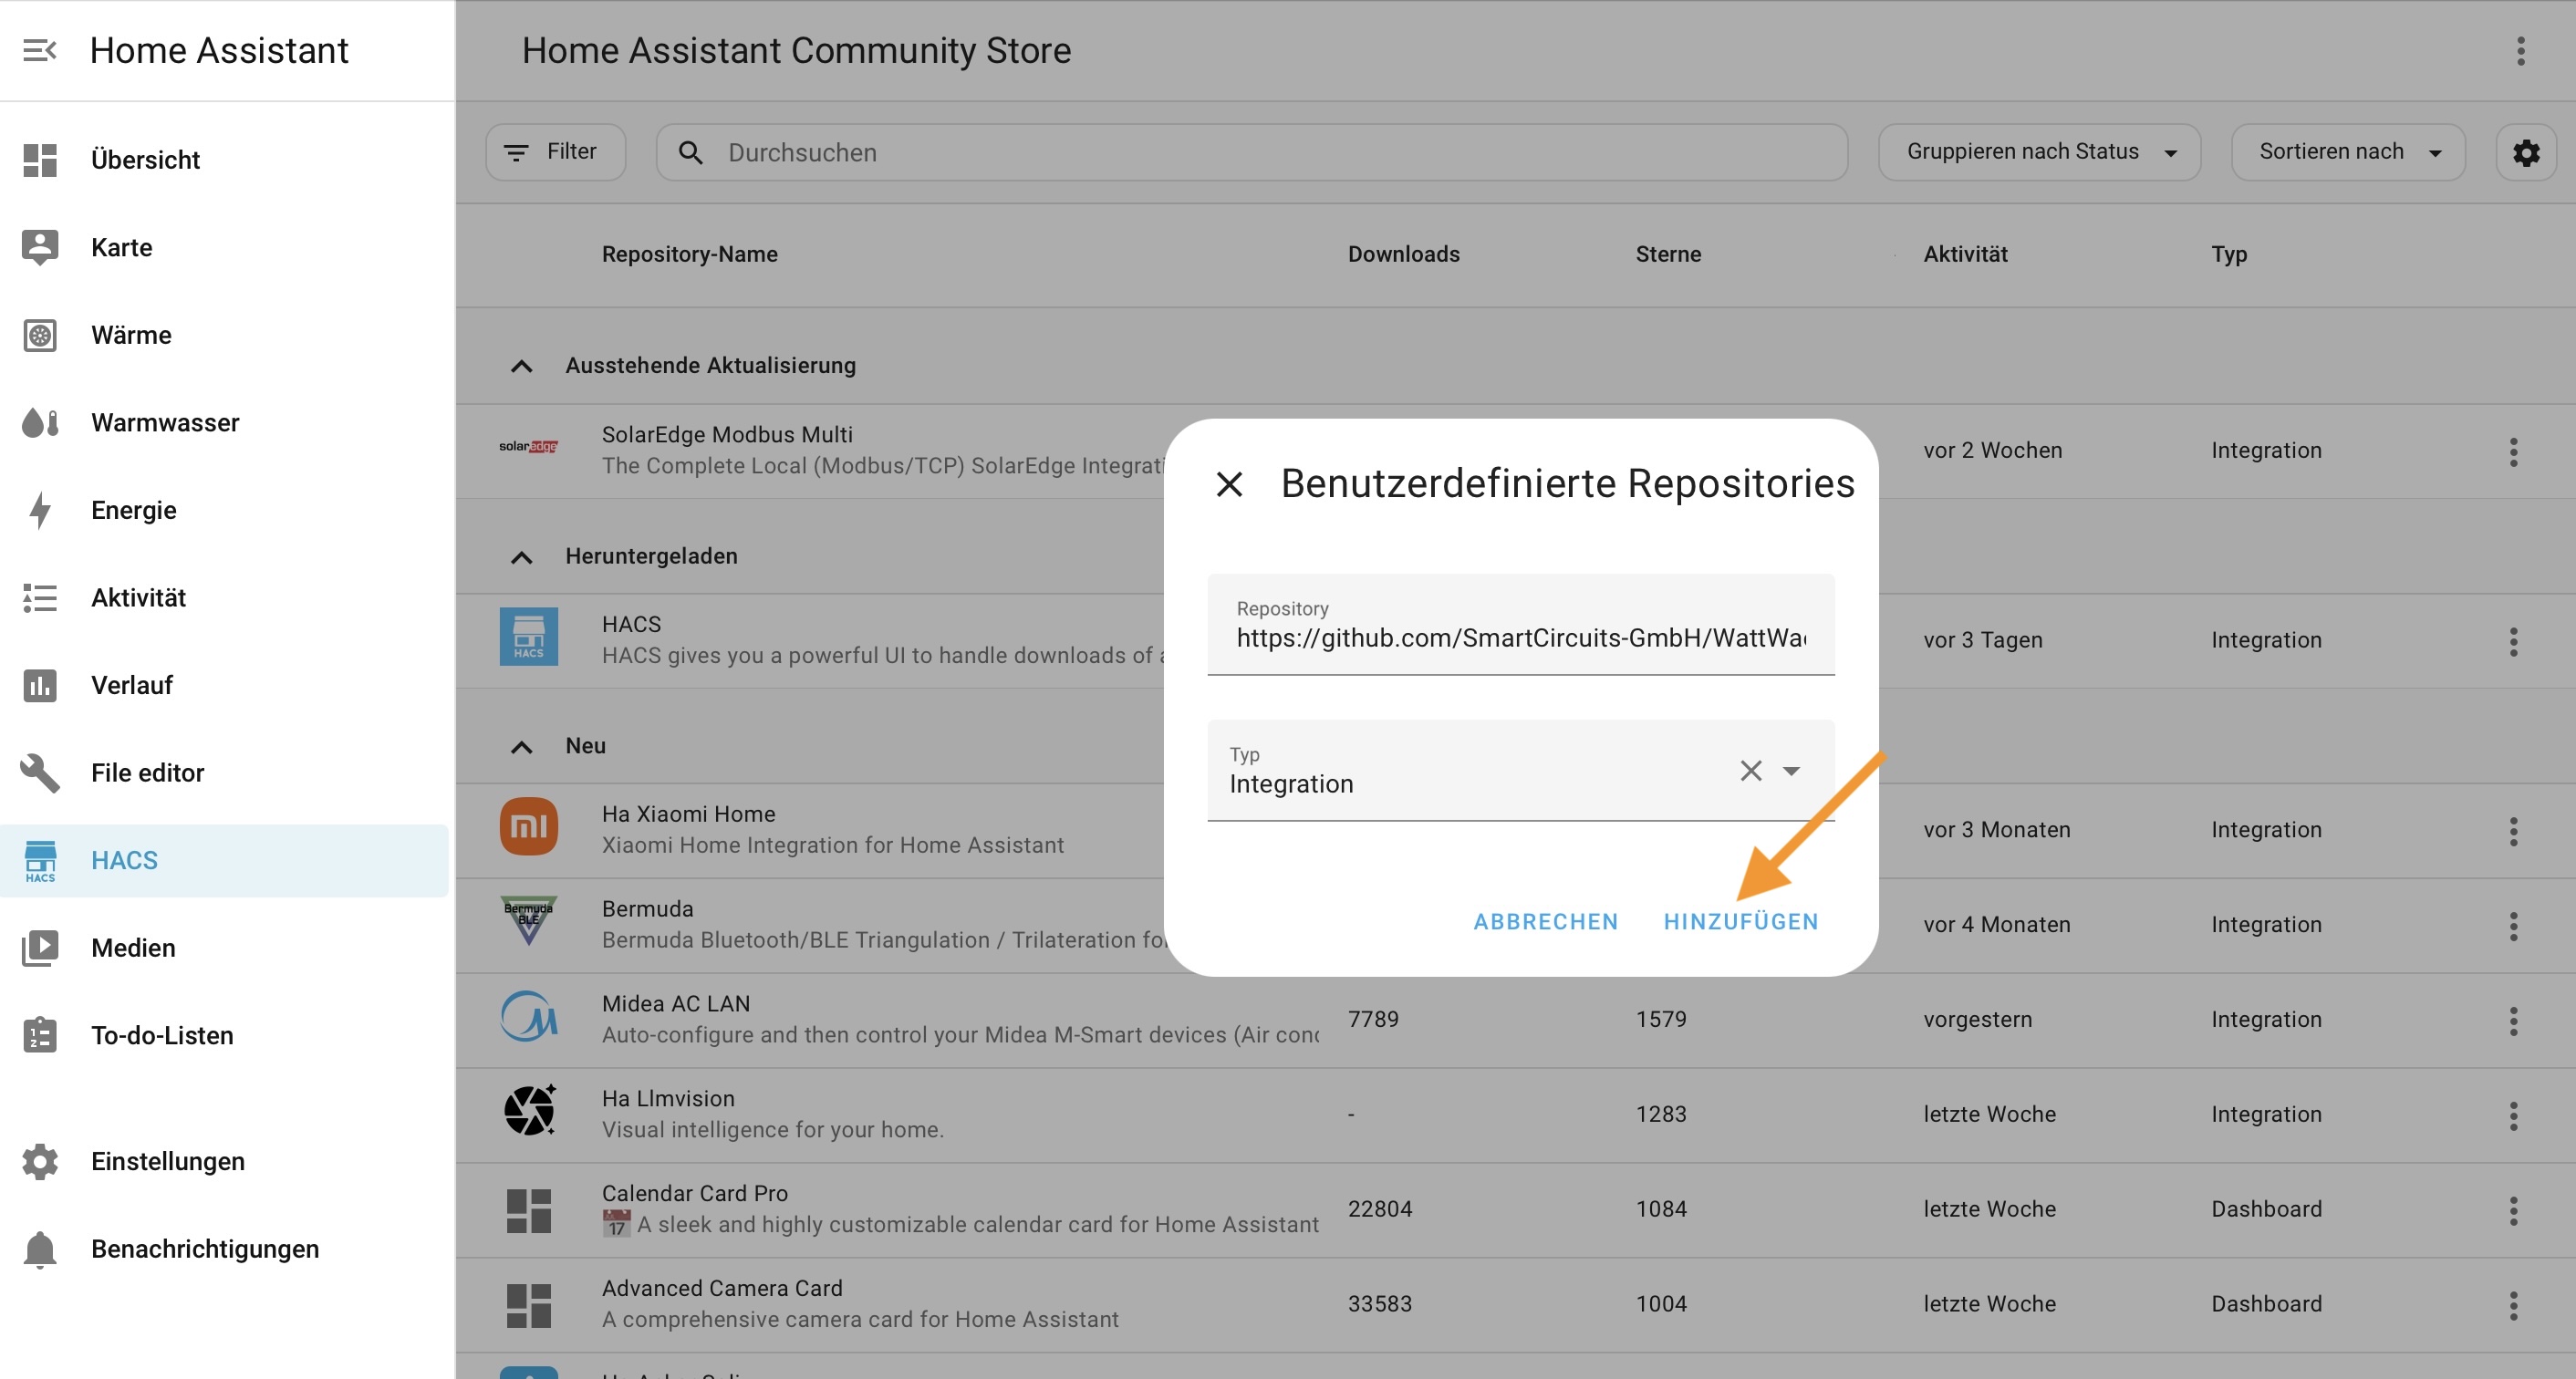
Step 2: Enter Repository URL
Enter the following details in the dialog:
- Repository:
https://github.com/SmartCircuits-GmbH/WattWaechter_HA_Integration - Type:
Integration
Then click Add.
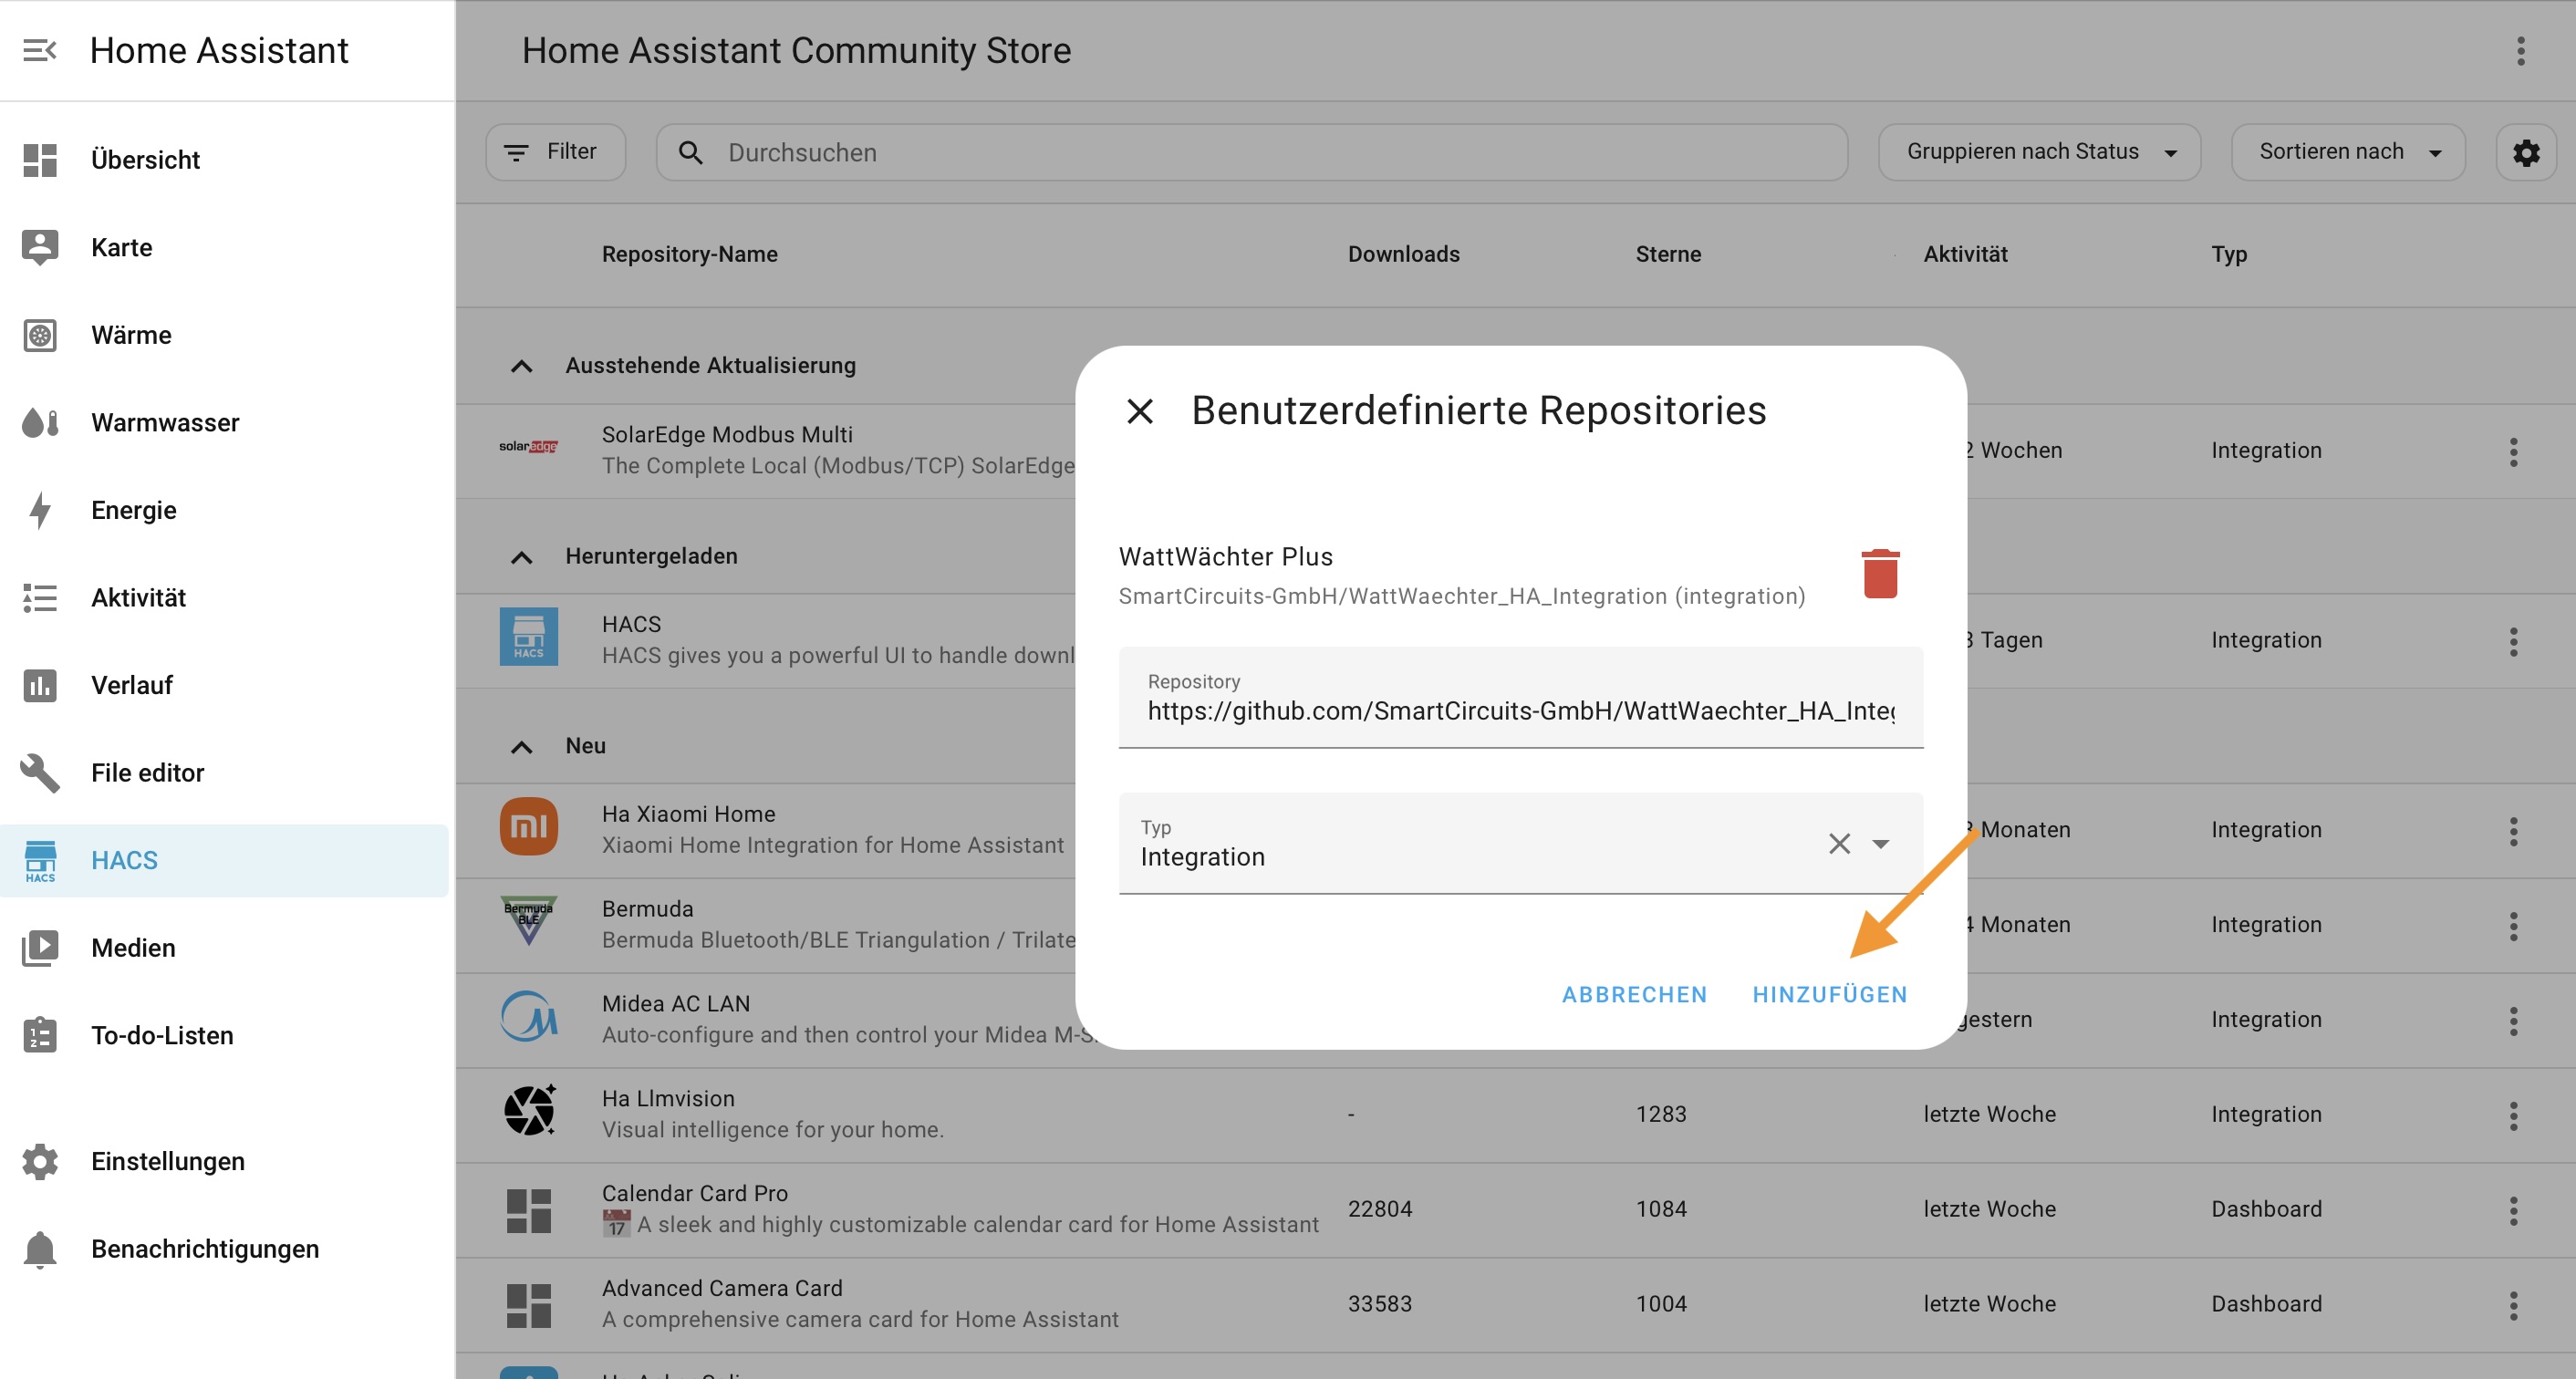
Step 3: Confirm Repository
The WattWächter Plus repository is detected and displayed. Click Add again to add it to your HACS store. After that, the integration appears like any other HACS integration in your local HACS overview and can be downloaded and updated from there.
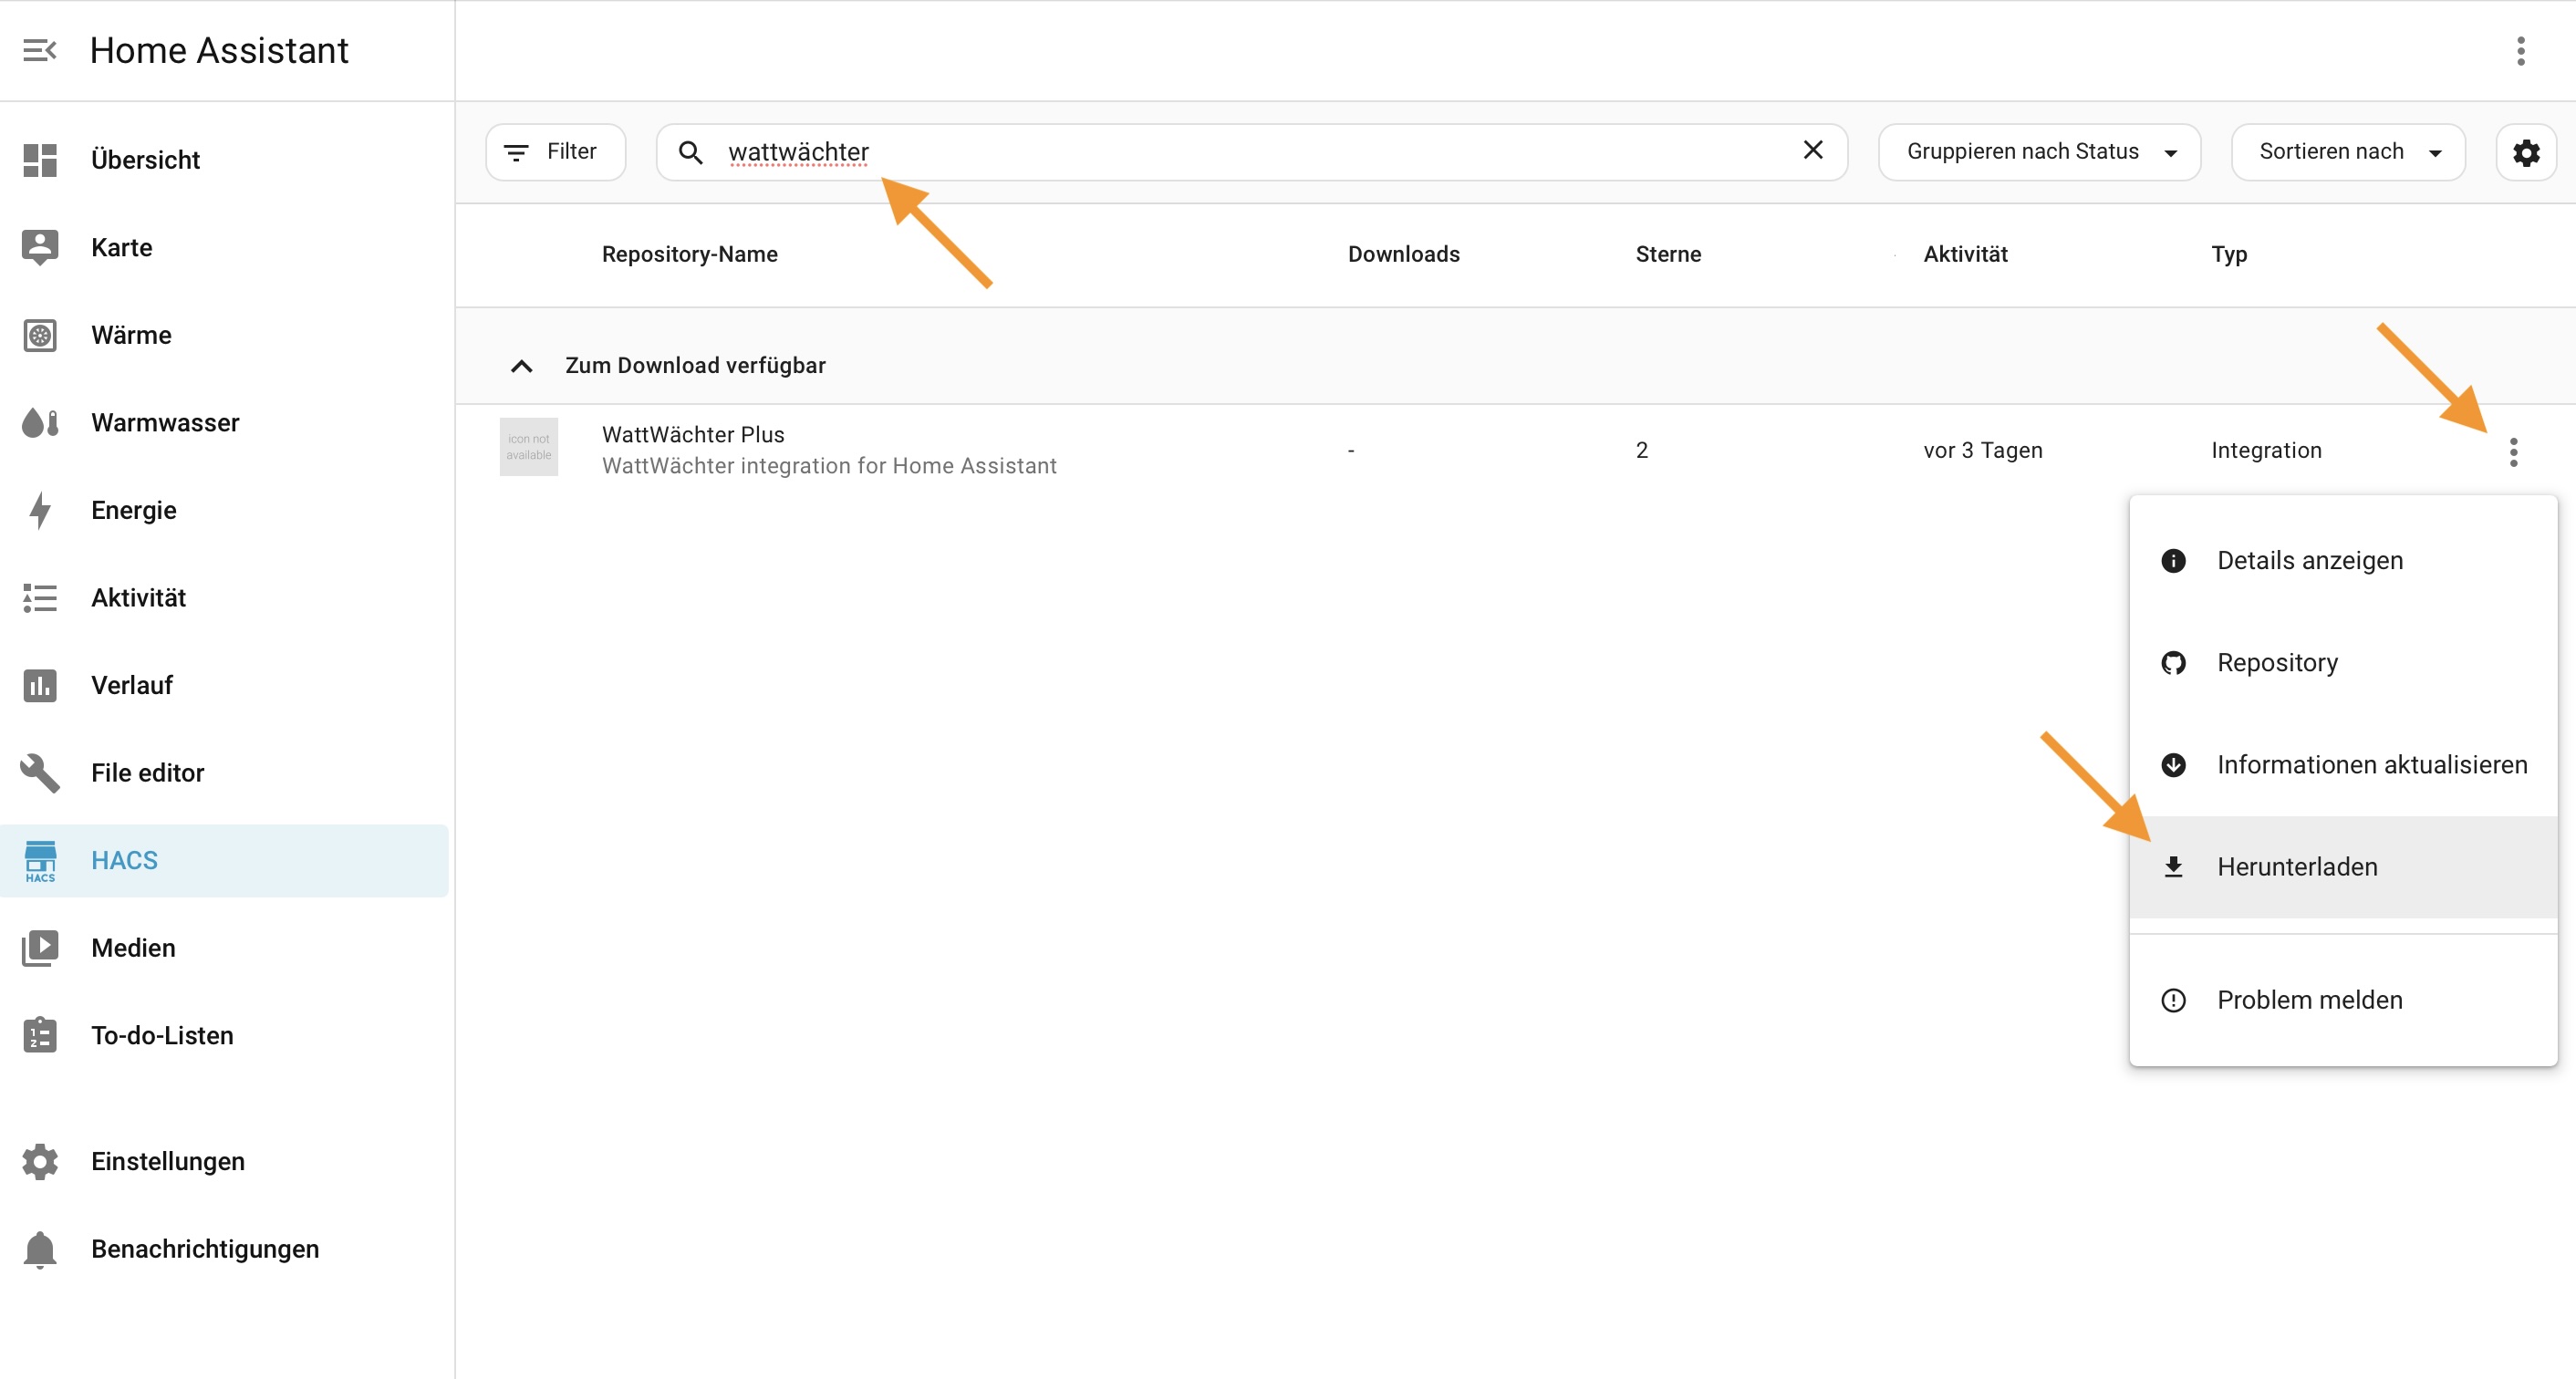
Step 4: Download the Integration
Search for WattWächter in HACS. You will find the integration under Available for download. Click the three-dot menu () and select Download.
Step 5: Select Version and Download
Select the desired version (latest by default) and click Download. The integration will be downloaded to /config/custom_components/wattwaechter.

Step 6: Restart Home Assistant
Restart Required
After downloading the integration, Home Assistant must be restarted for the integration to be loaded. Go to Settings > System > Restart. Then continue as described under Setting Up the Integration above.