Loxone Miniserver
The WattWächter Plus integrates with Loxone via its Modbus TCP server. Loxone Config has no SunSpec auto-discovery — unlike Home Assistant or evcc, the Miniserver does not parse the SunSpec header itself.
So that you don't have to type register addresses by hand, there are two ready-made Loxone templates. They create all Modbus sensors, set the data type, polling cycle and scaling, and deliver values directly in kW, kWh, A, V and Hz. The manual route is still described under Adding registers manually.
This guide as a PDF
For printing, passing on and for the Loxone Library, this guide is also available as a PDF: English · Deutsch
Prerequisites
- WattWächter Plus running firmware 1.2.0 or newer
- Modbus TCP enabled on the WattWächter — web interface → Settings → Modbus TCP → Enable Modbus TCP server → Save. Other ways under Modbus TCP → Enabling
- Loxone Miniserver (Gen 1 with Modbus Extension or Gen 2) on the same network
- Loxone Config 17.1.6.30 or newer — the templates declare this as their minimum version
- A static IP address for the WattWächter (see the warning below)
Loxone needs the IP address — not the .local name
The Miniserver does not resolve mDNS/.local names. Enter the WattWächter's
IP address in the Modbus server object, not wattwaechter-XXXXXXXXXXXX.local.
Set up a DHCP reservation in your router or configure a static IP on the WattWächter. Without it the connection breaks on the next lease change — and Loxone will silently keep showing the last value it read instead of reporting an error. The FAQ explains how to find the current IP.
Downloading the templates
| Template | Sensors | Contents | Who is it for? |
|---|---|---|---|
| WattWächter Plus | 3 | Active power, import, export | The default — every supported meter delivers these three values |
| WattWächter Plus – All Values | 15 | Additionally per-phase power/current/voltage, total current, average voltage, grid frequency | Meters that also send per-phase values |
Download — pick the file that matches your meter:
WattWächter Plus (3 values) All Values (15 values)
When in doubt, take the small template
Which registers your meter actually populates depends on the meter model. W
(active power), TotWhImp (import) and TotWhExp (export) are always valid —
everything else only if your meter sends the matching OBIS codes. If you use
"All Values", the sensors that aren't delivered will show a fixed placeholder value;
see Removing values your meter doesn't deliver
for how to spot and remove them.
Step 1 — Add the Modbus server
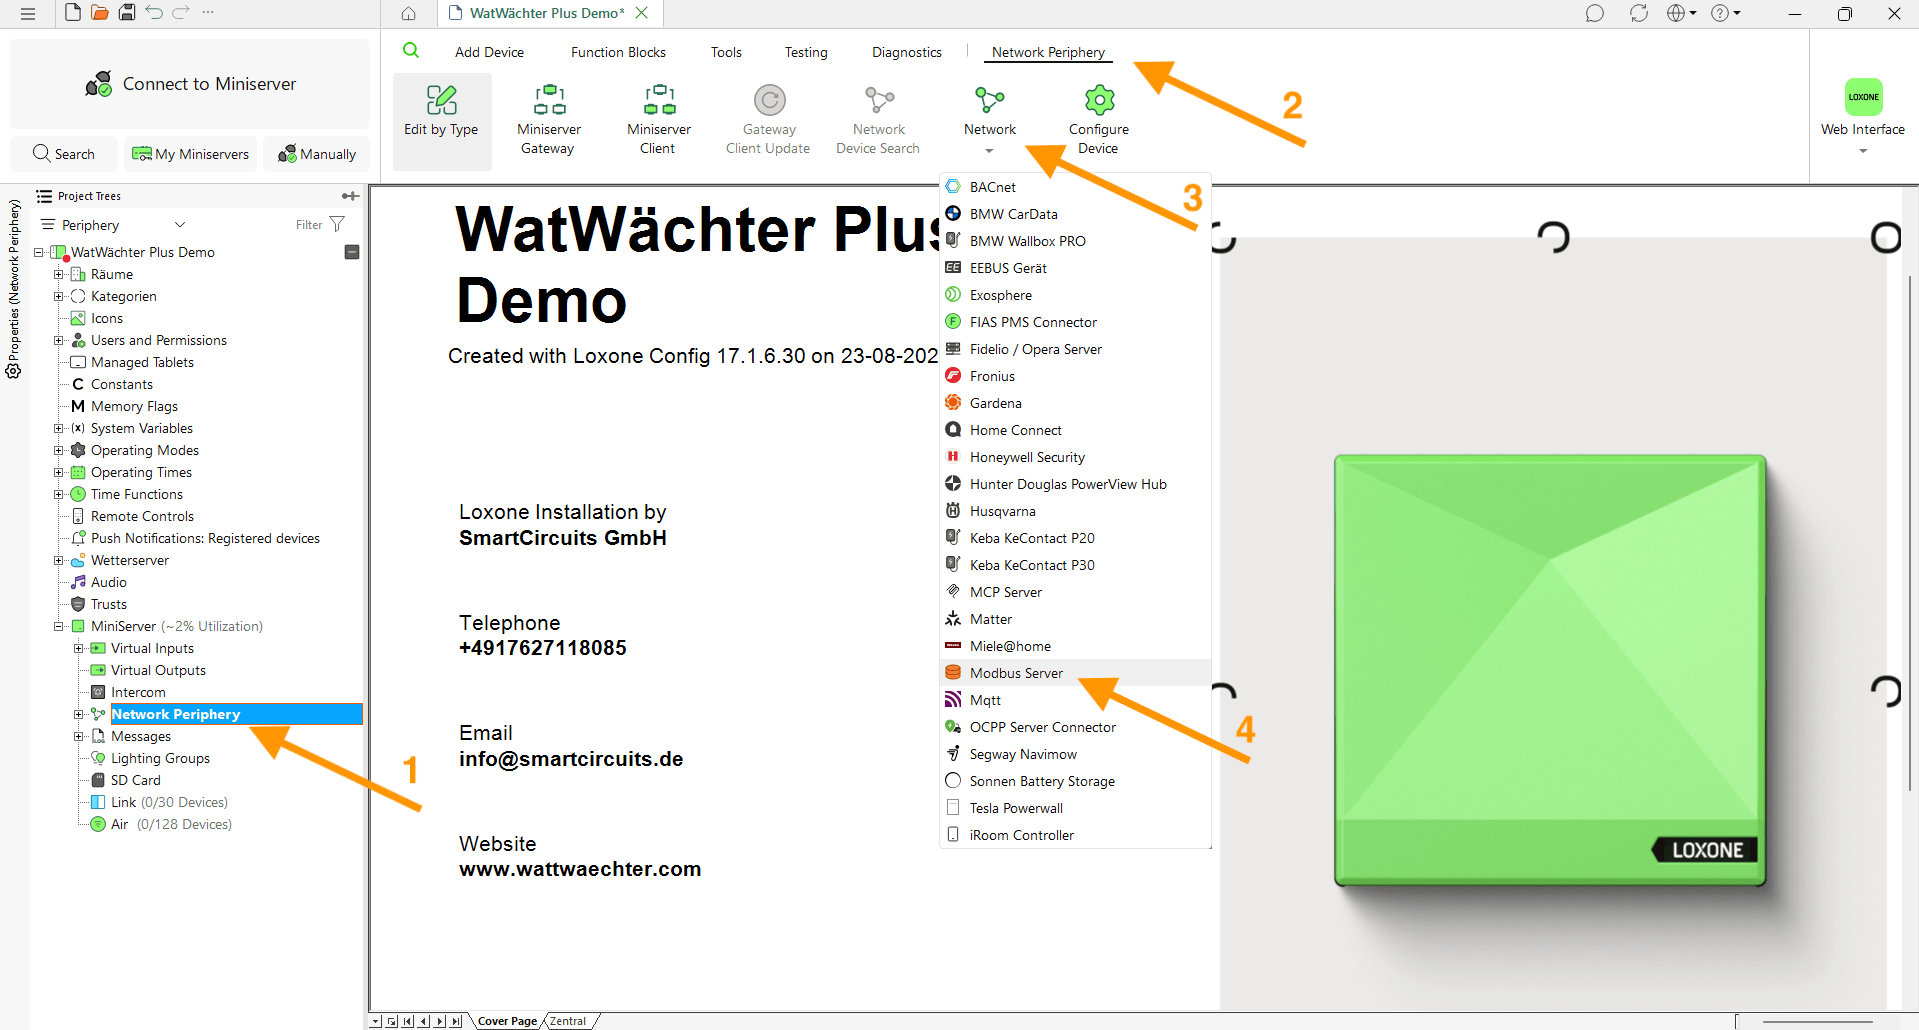
In the project tree, select Network Periphery under MiniServer (1). Open the Network Periphery ribbon tab (2), click Network (3) and choose Modbus Server (4).
Step 2 — Configure the Modbus server
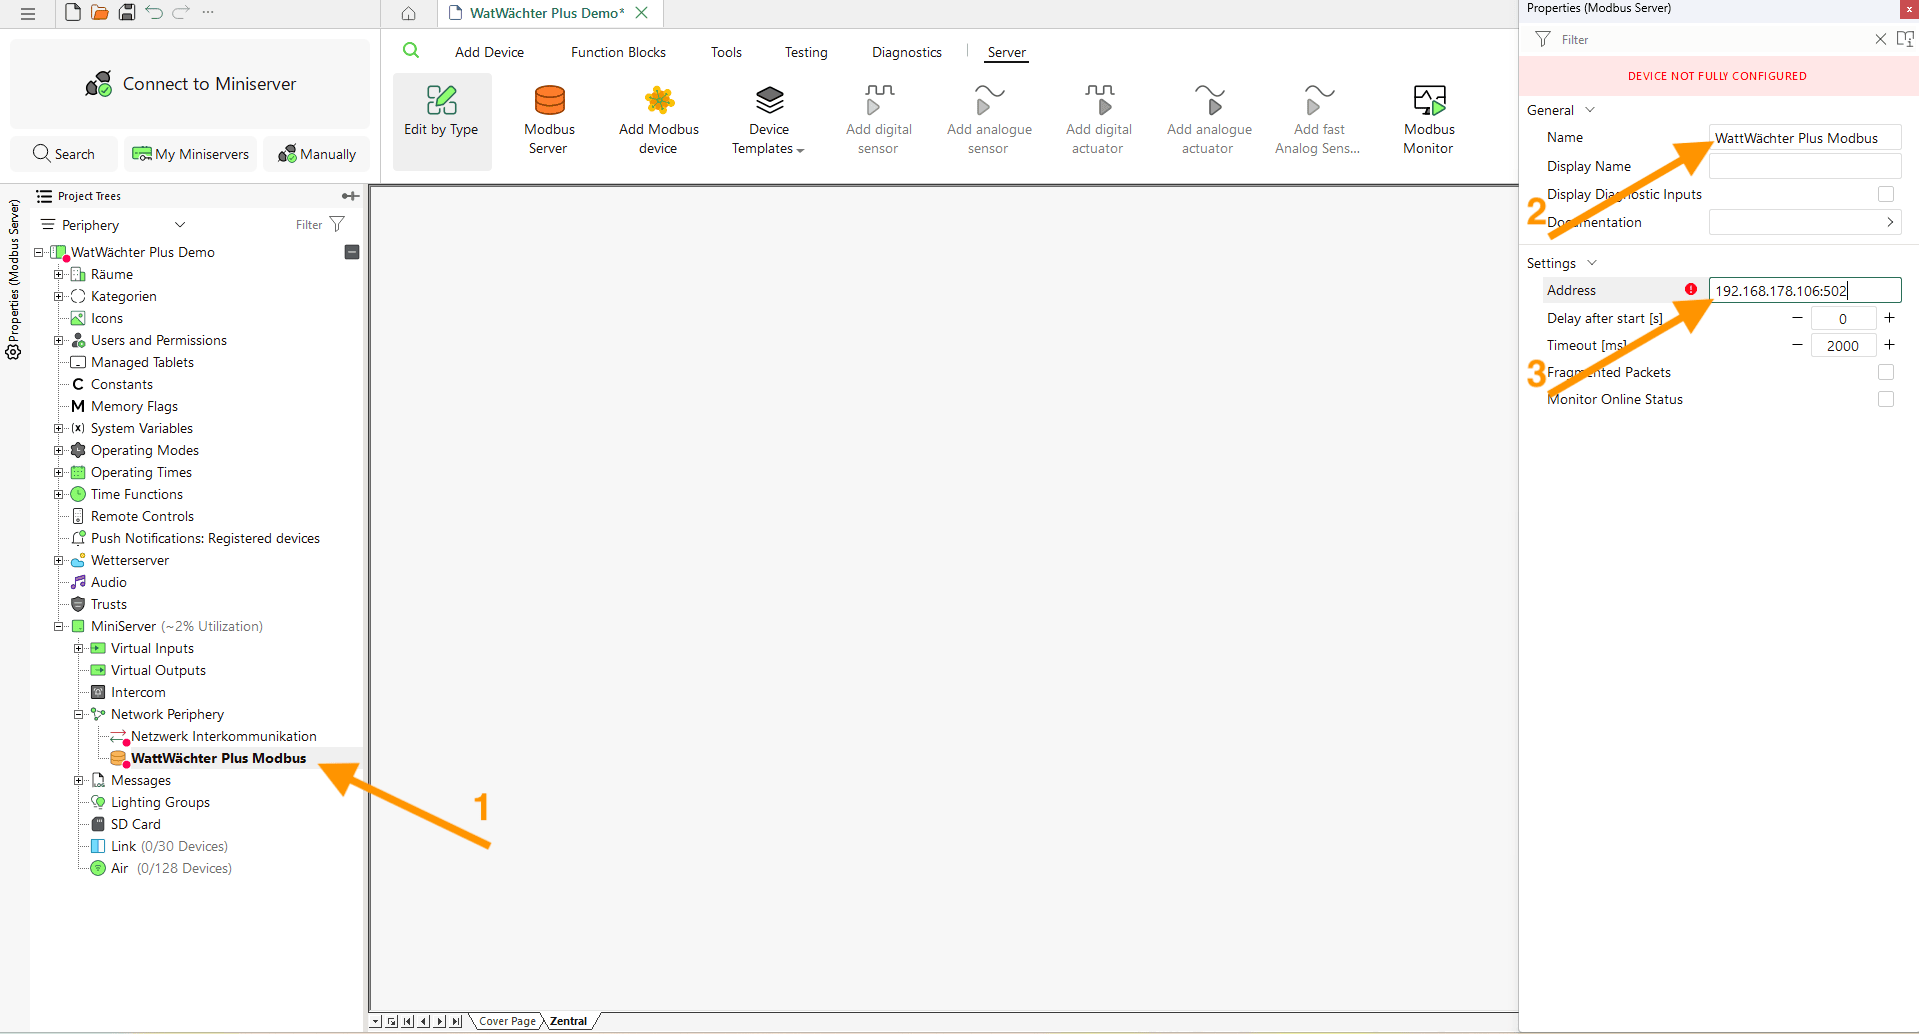
Select the newly created Modbus server in the project tree (1). The Properties panel opens on the right. Enter a Name (2) — e.g. WattWächter Plus Modbus — and as Address the WattWächter's IP address followed by the port, separated by a colon (3):
| Field | Value |
|---|---|
| Name | free choice, e.g. WattWächter Plus Modbus |
| Address | <IP address>:502 — e.g. 192.168.178.106:502 |
| Delay after start [s] | 0 |
| Timeout [ms] | 2000 |
| Fragmented Packets | off |
| Monitor Online Status | optional — reports connection drops |
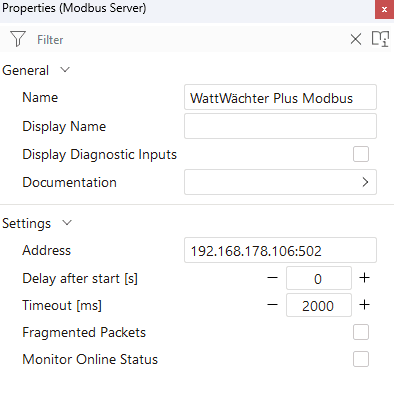
The port goes into the same field
Loxone has no separate port field: port 502 is appended to the IP address. If you configured a different port on the WattWächter, enter that one here.
As long as no device is attached below the server, Loxone shows "Device not fully configured". That disappears with the next step.
Step 3 — Import the template
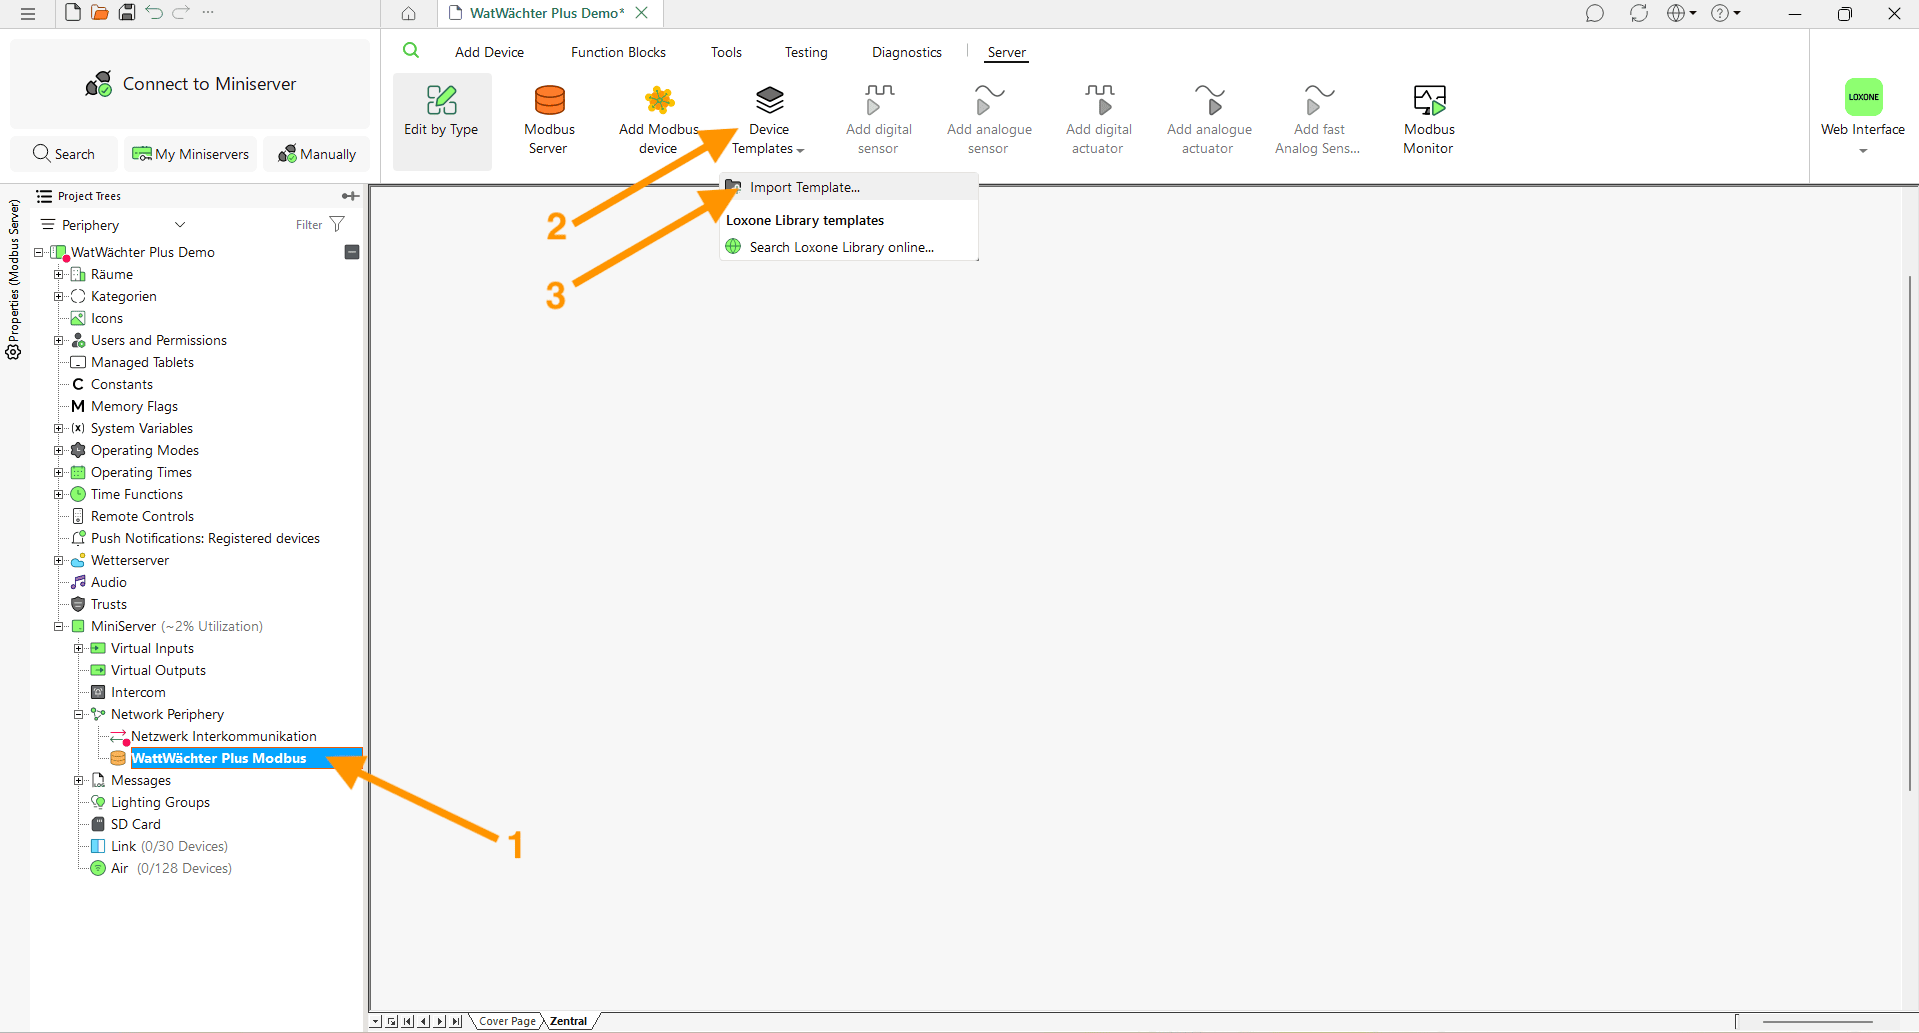
Select the Modbus server (1), open Device Templates in the ribbon (2) and click Import Template… (3). Pick the XML file you downloaded above.
Step 4 — Select the template
After the import, the template appears under Device Templates in the My templates section. Click it — Loxone then creates the Modbus device and all its sensors below the Modbus server.
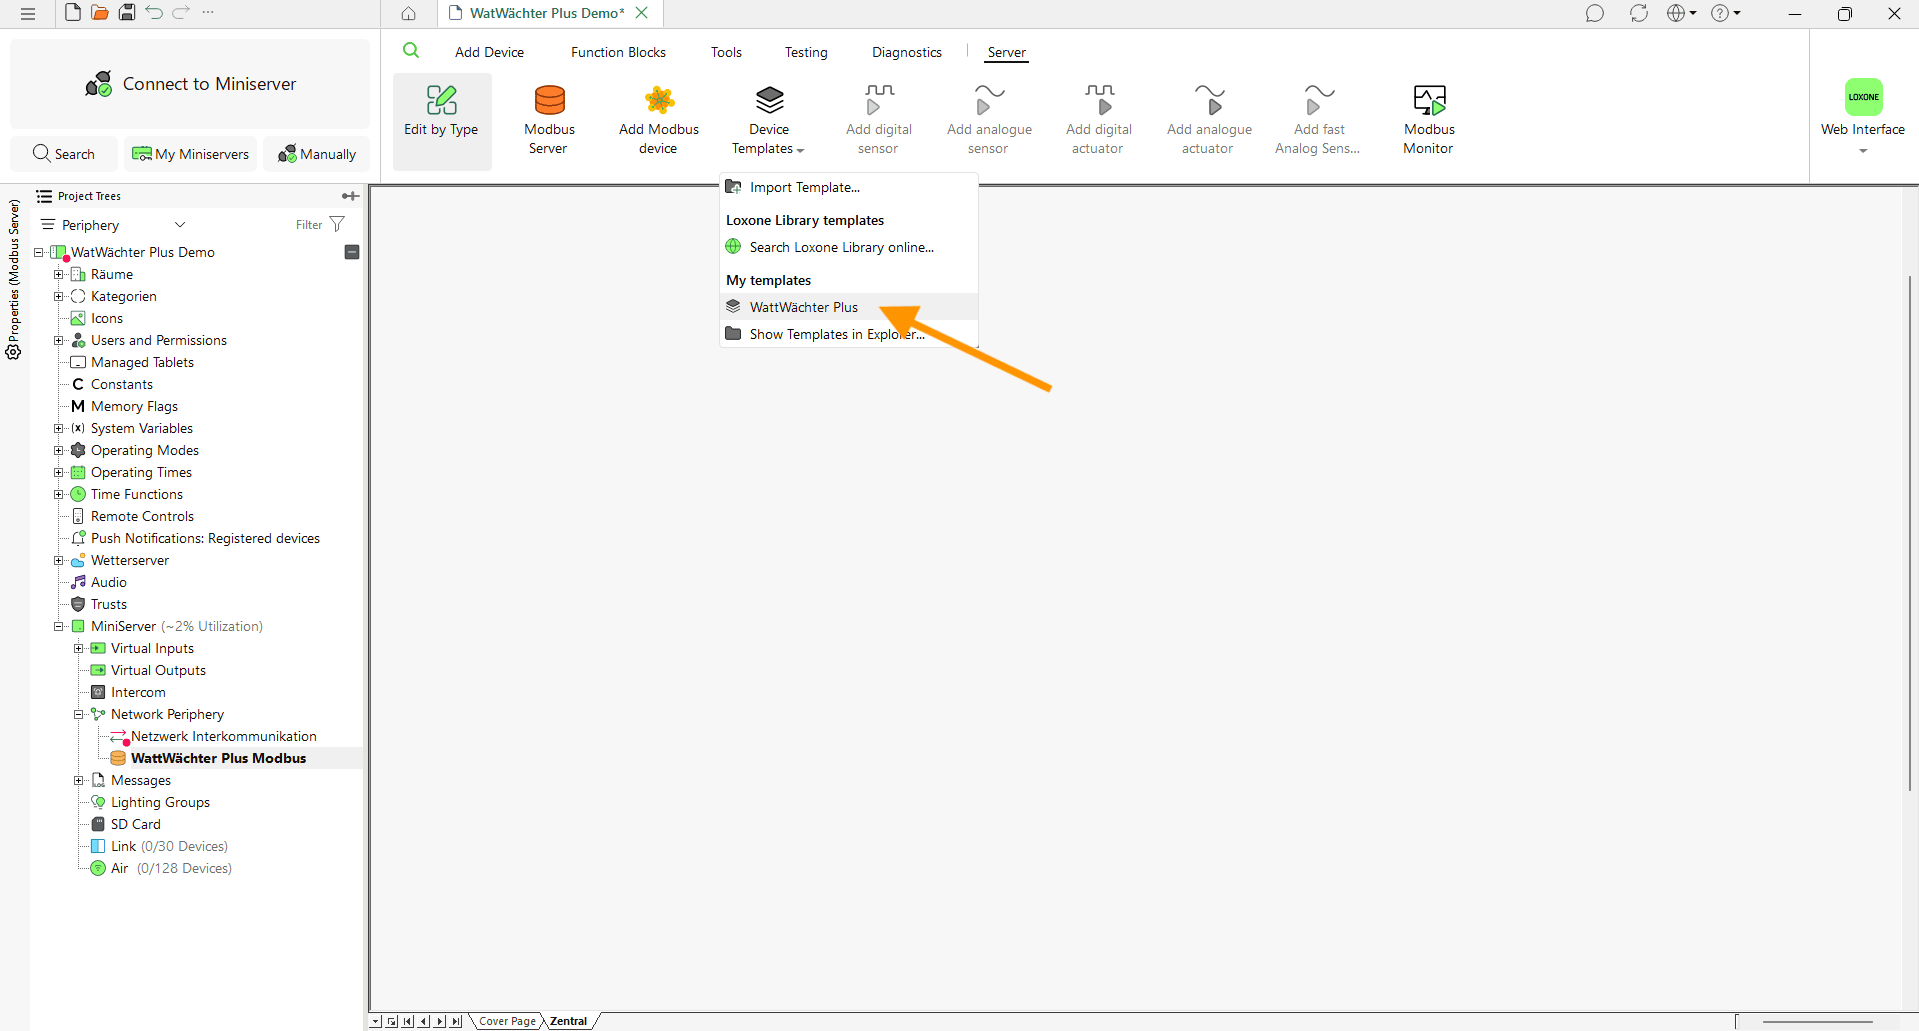
Where do the templates live on disk?
Show Templates in Explorer… opens the folder where Loxone Config keeps its Modbus
templates. You can also copy the XML files there directly; they must start with MB_
and are picked up after restarting Loxone Config.
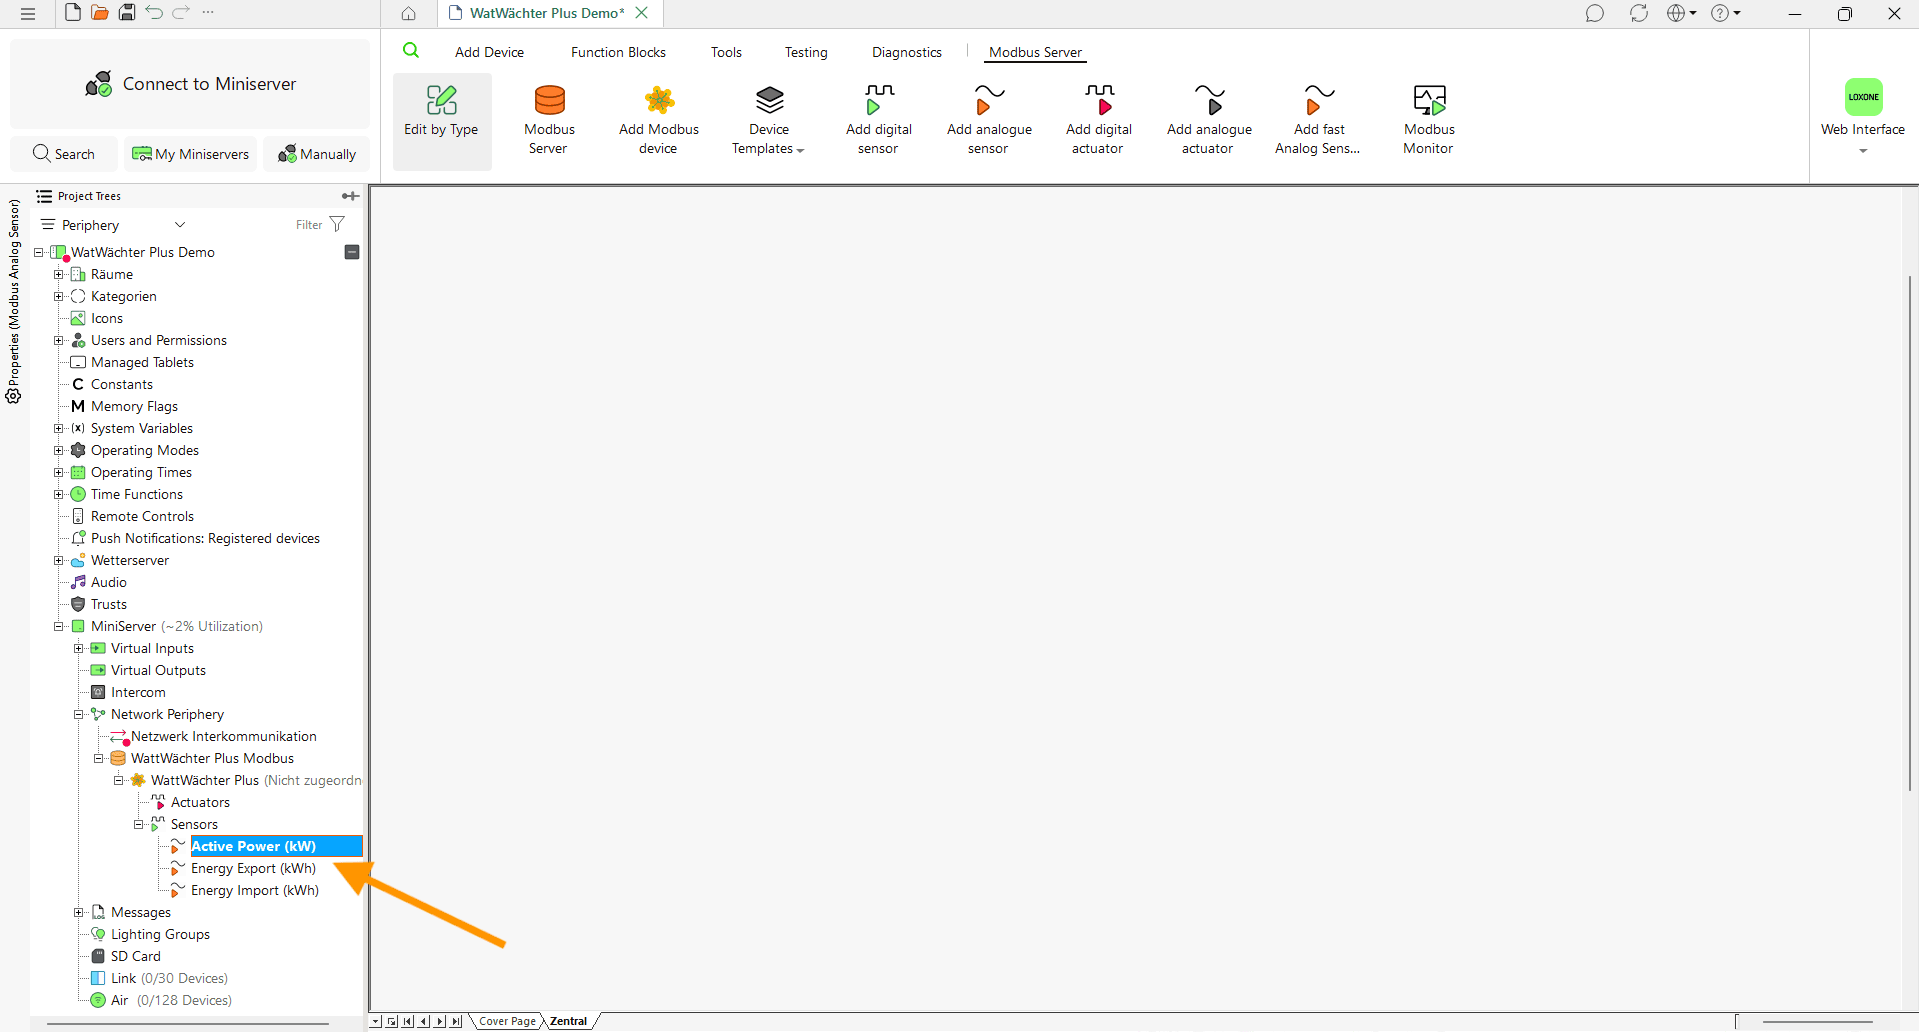
Step 5 — Check the sensors that were created
The project tree now shows the device below the Modbus server, and below that a Sensors branch with the analogue inputs. The small template creates three:
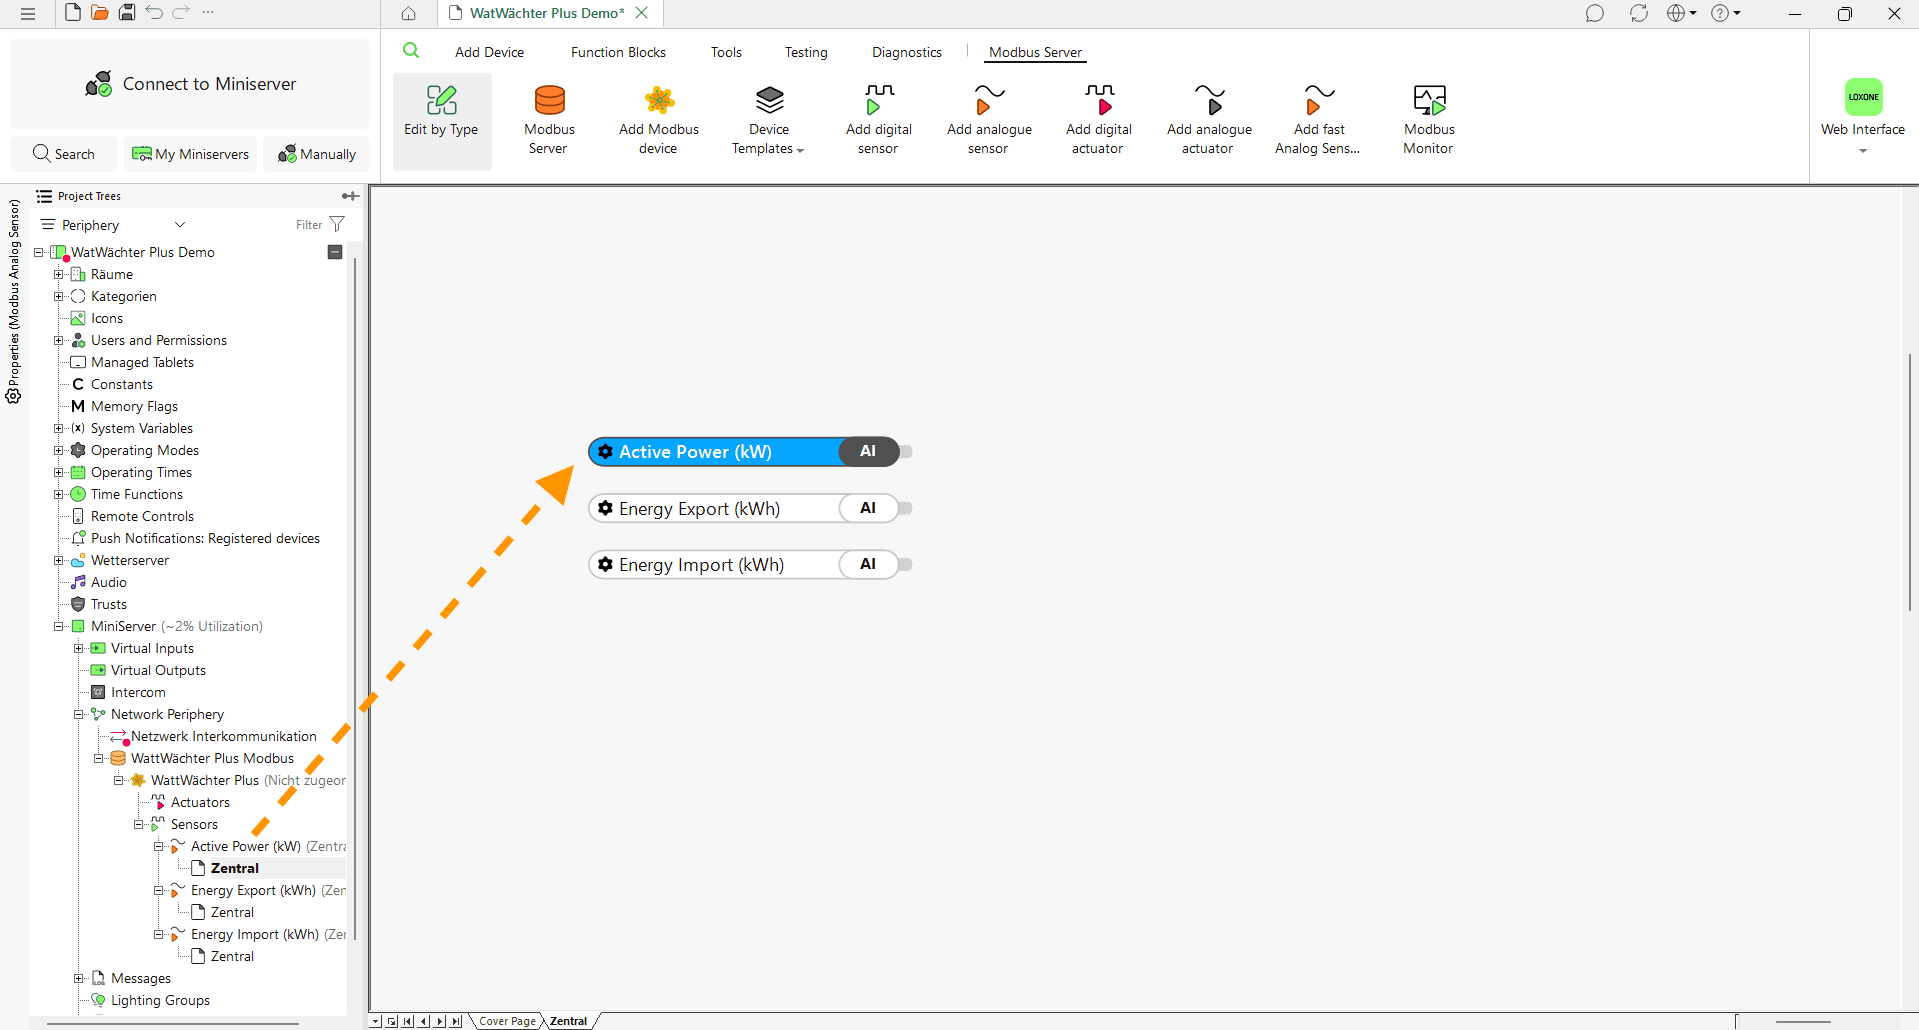
Step 6 — Drag the sensors onto a page
Drag the sensors from the project tree onto a programming page so you can wire them up and watch them in LIVE mode.
Step 7 — Connect to the Miniserver and save
Click Connect to Miniserver (1), pick your Miniserver and confirm with Connect (2).
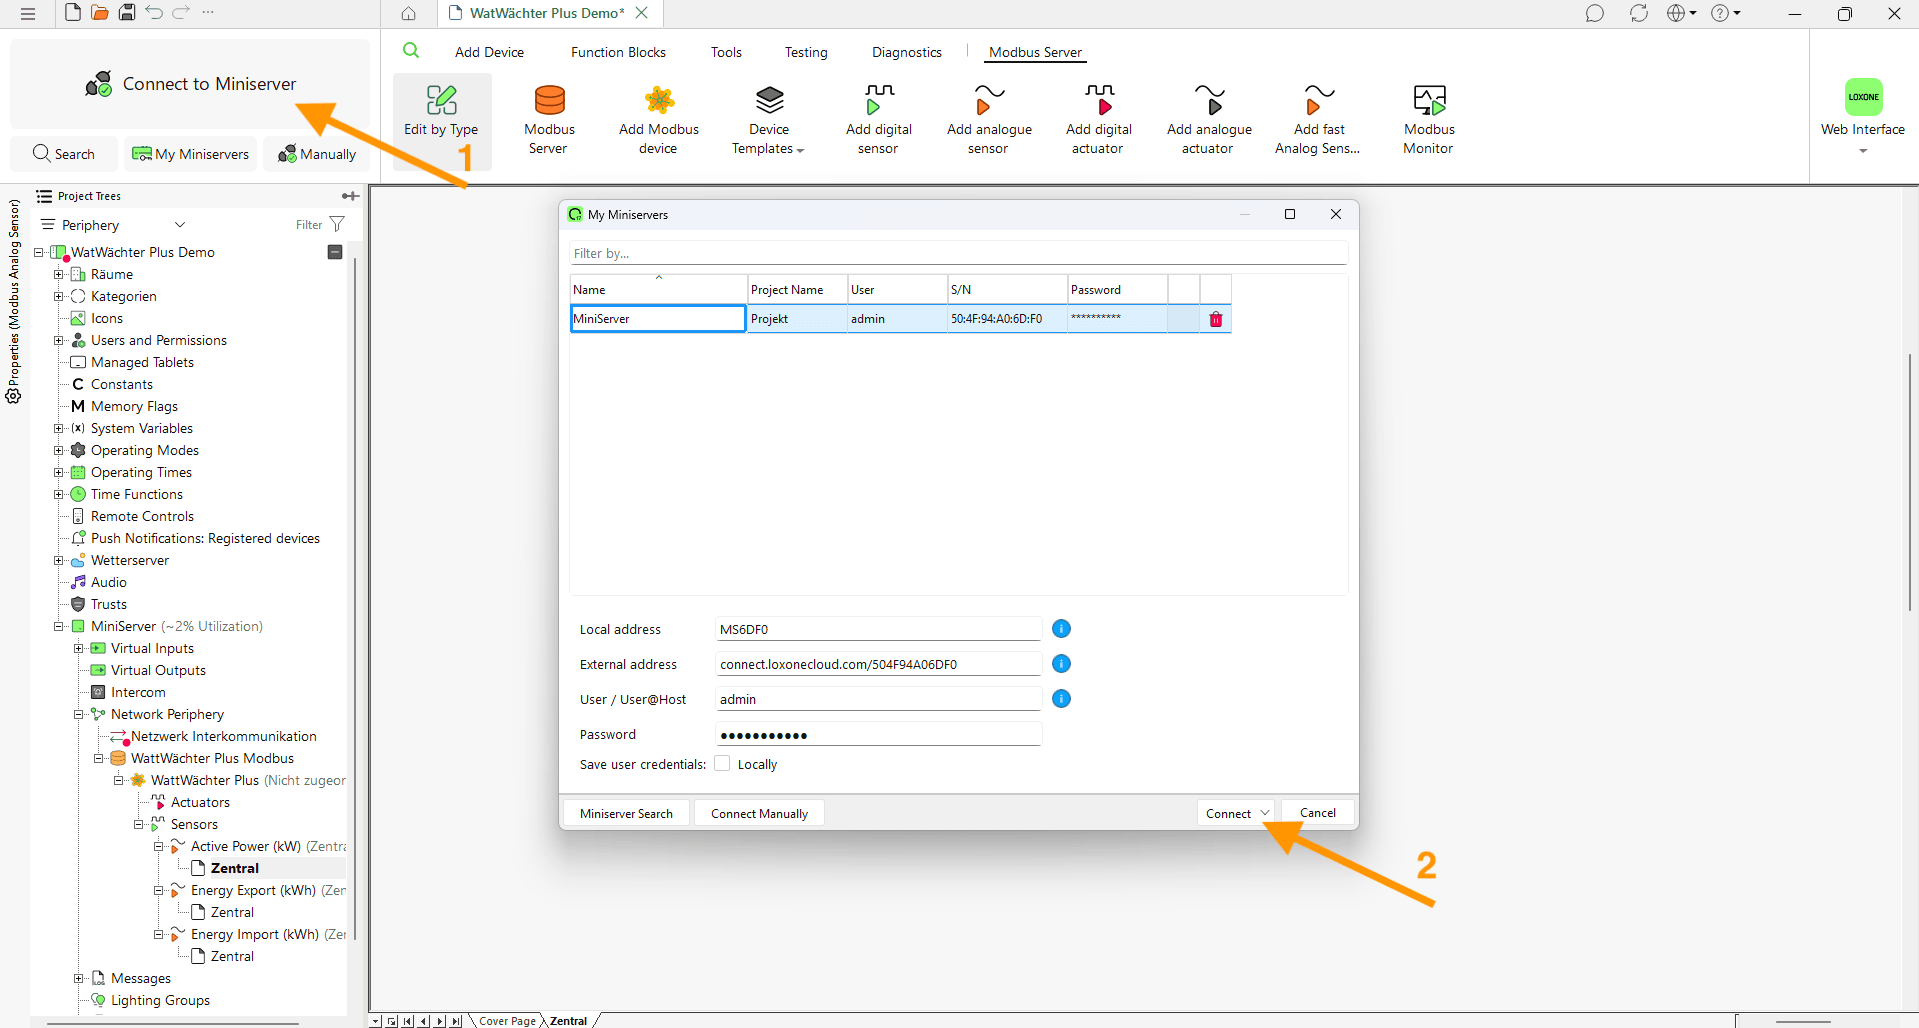
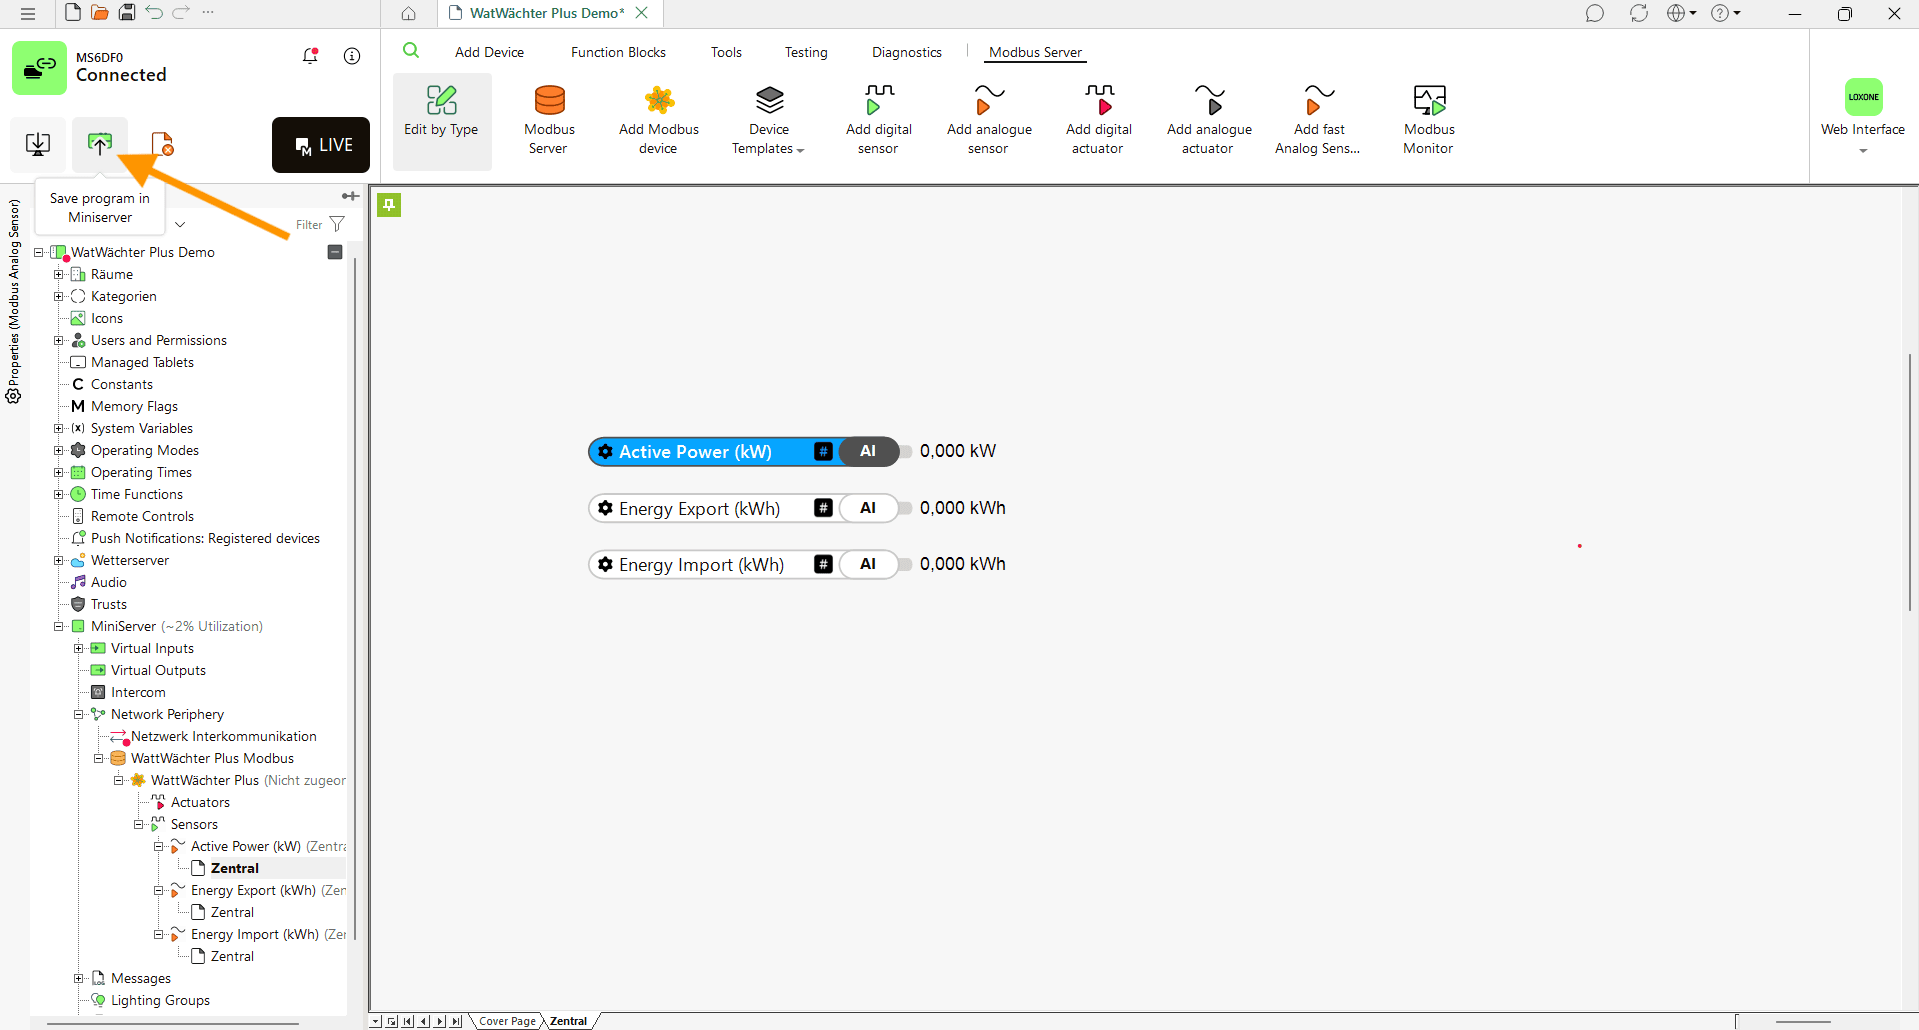
Then transfer the program with Save program in Miniserver:
Step 8 — Verify the values in LIVE mode
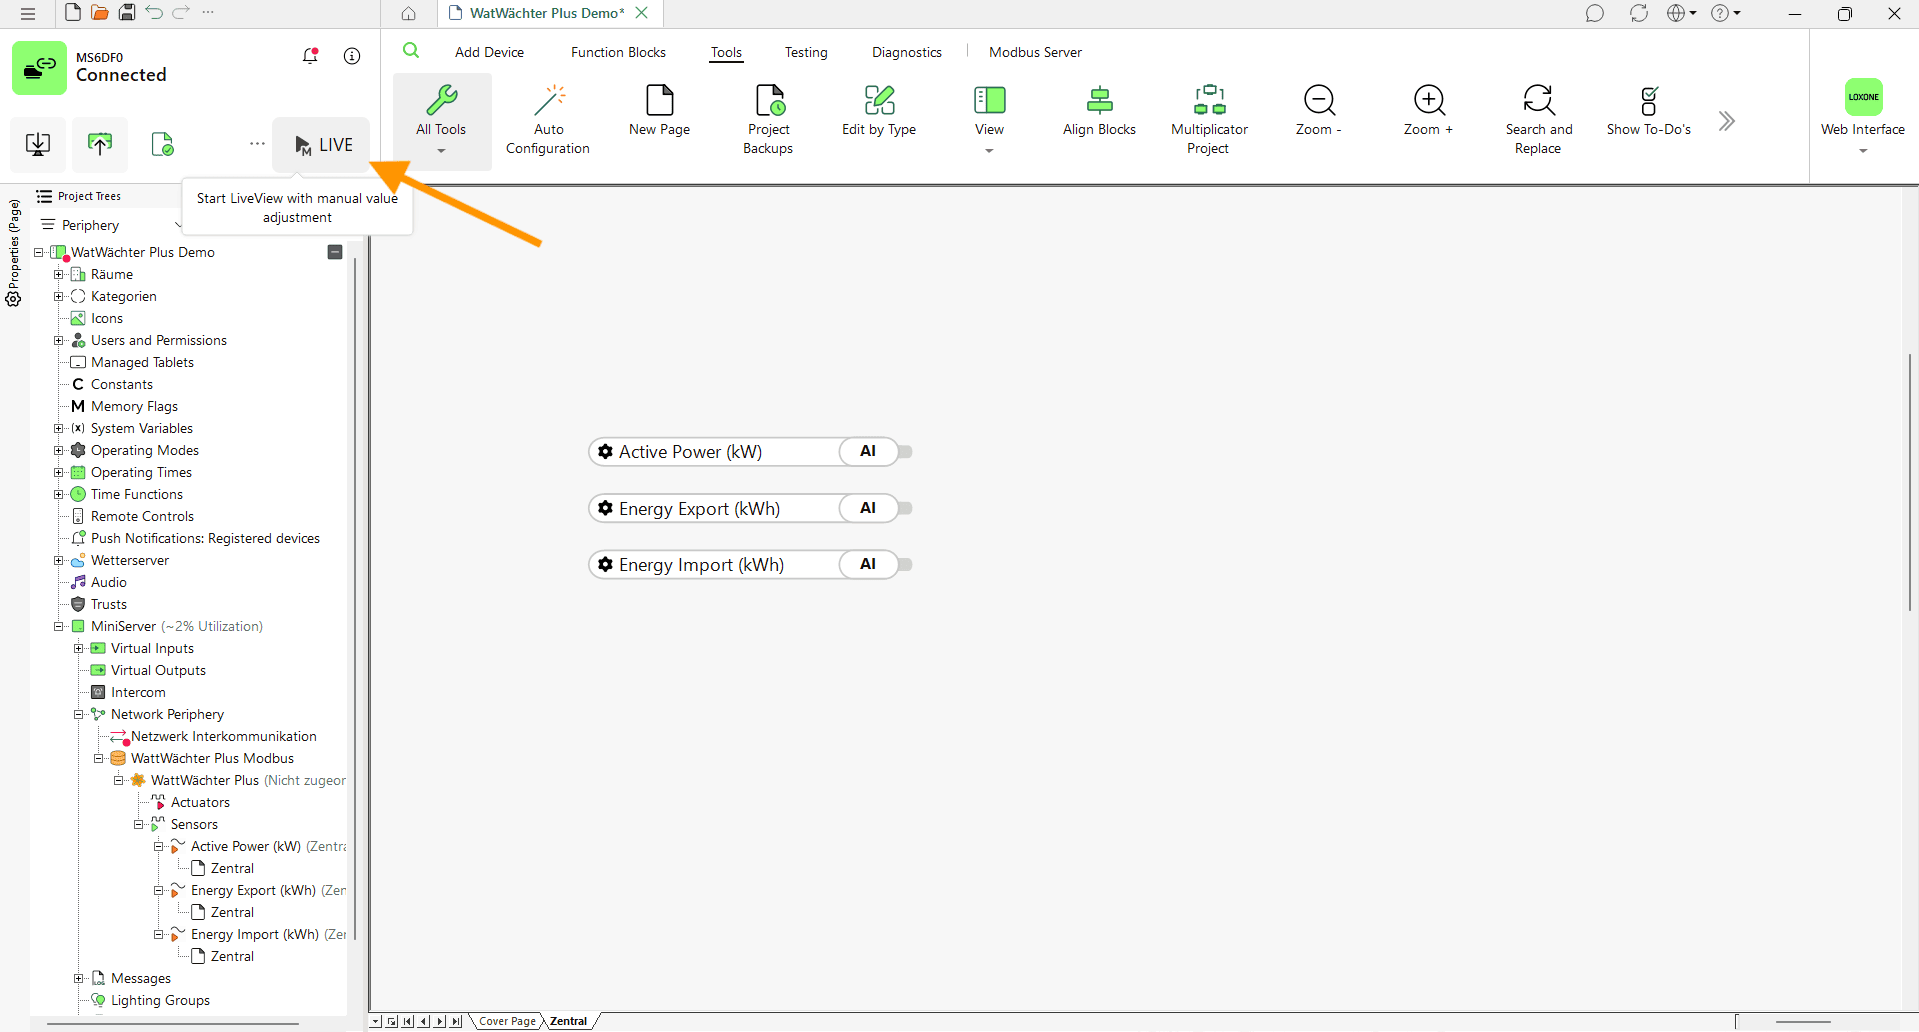
Start LIVE mode:
The sensors now show the raw register value on the left and the converted value with its unit on the right:
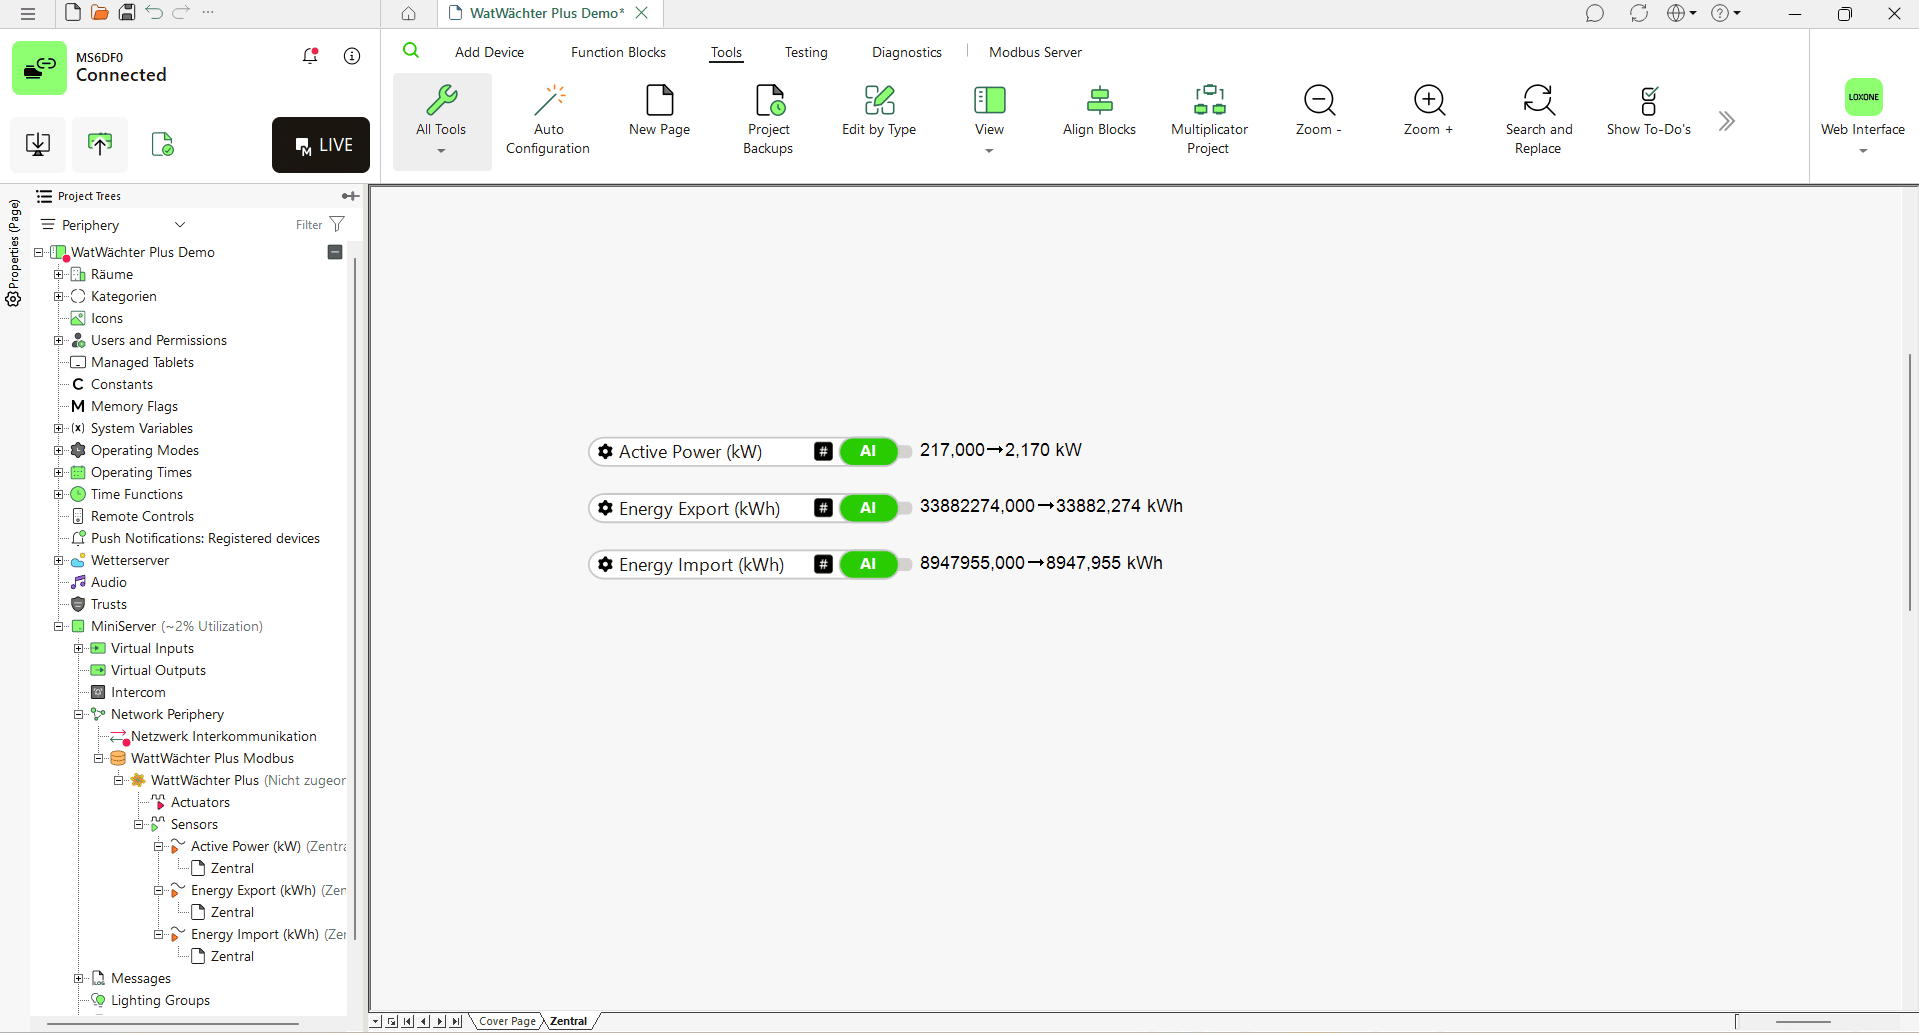
In the example, 217,000 → 2,17 kW means: register 40088 returns the raw value 217, and the template's correction turns that into 2.17 kW. (The screenshots use German number formatting, where the comma is the decimal separator.)
Removing values your meter doesn't deliver
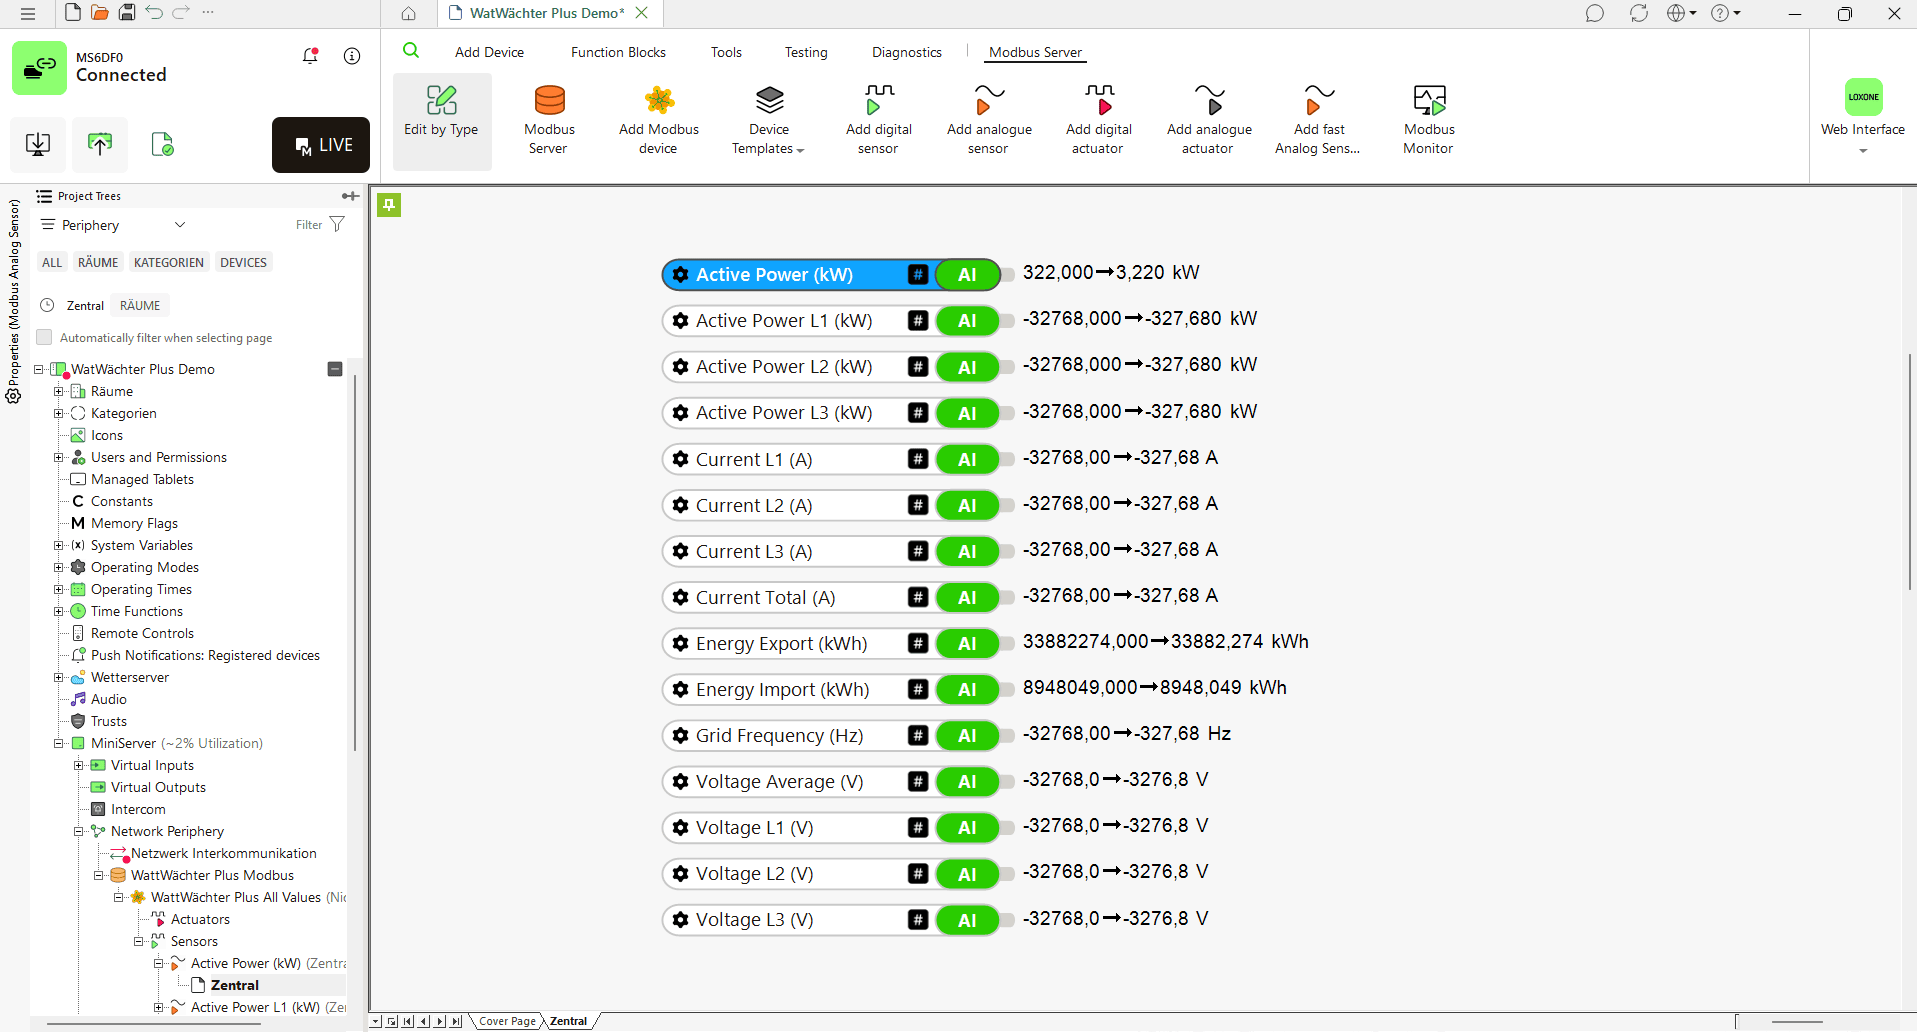
The "All Values" template creates all 15 registers — whether or not your meter populates them. A register without data returns the SunSpec sentinel 0x8000 (not implemented), i.e. the raw value -32768. After scaling, LIVE mode shows this:
| Reading | Meaning |
|---|---|
-327.68 kW |
the meter does not deliver this power register |
-327.68 A |
the meter does not deliver this current register |
-3276.8 V |
the meter does not deliver this voltage register |
-327.68 Hz |
the meter does not deliver the grid frequency |
Just delete them instead of filtering
You don't need a status block to filter these sensors out — delete them in the project tree. What your meter doesn't send now, it won't send after a restart either. Only if you deliberately want to keep a value (e.g. because the meter delivers it intermittently) should you filter values ≤ −32000 with a status block.
Which registers your device is currently populating with valid values is shown by the status endpoint — no detour through Loxone needed.
What the templates contain
All sensors read with function code 0x03 (Read Holding Registers). The Correction column is the factor the template stores in the sensor — it already contains both the SunSpec scale factor and the conversion to the target unit.
| Sensor | Register | Type | Cycle | Correction | Unit | Template |
|---|---|---|---|---|---|---|
| Active Power | 40088 | int16 | 5 s | ×0.01 | kW | both |
| Energy Import | 40116 | acc32 | 30 s | ×0.001 | kWh | both |
| Energy Export | 40108 | acc32 | 30 s | ×0.001 | kWh | both |
| Active Power L1 | 40089 | int16 | 5 s | ×0.01 | kW | All Values |
| Active Power L2 | 40090 | int16 | 5 s | ×0.01 | kW | All Values |
| Active Power L3 | 40091 | int16 | 5 s | ×0.01 | kW | All Values |
| Current L1 | 40073 | int16 | 10 s | ×0.01 | A | All Values |
| Current L2 | 40074 | int16 | 10 s | ×0.01 | A | All Values |
| Current L3 | 40075 | int16 | 10 s | ×0.01 | A | All Values |
| Current Total | 40072 | int16 | 10 s | ×0.01 | A | All Values |
| Voltage L1 | 40078 | int16 | 10 s | ×0.1 | V | All Values |
| Voltage L2 | 40079 | int16 | 10 s | ×0.1 | V | All Values |
| Voltage L3 | 40080 | int16 | 10 s | ×0.1 | V | All Values |
| Voltage Average | 40077 | int16 | 10 s | ×0.1 | V | All Values |
| Grid Frequency | 40086 | int16 | 10 s | ×0.01 | Hz | All Values |
The complete register map (all SunSpec fields, data types, OBIS codes) is in the Modbus TCP reference.
The scaling is hard-coded in the template
Loxone cannot evaluate the SunSpec SF registers at runtime. The templates therefore
write the factor straight into the sensor correction — matching the current scale
factors (W_SF = 1, A_SF = -2, V_SF = -1, Hz_SF = -2, TotWh_SF = 0).
W_SF changed from 0 to 1 in firmware 1.2.0: the power registers
have counted tens of watts since then, so that connections above 32.7 kW are covered.
Older firmware therefore reports values off by a factor of 10 — the templates are not
meant for it. After a firmware update, check the SF registers (40092, 40076, 40085, 40087,
40124) and re-import the current template if needed.
Splitting import and export
Total power W (40088) is signed: positive on import, negative on export. For the Loxone energy monitor, split the value via a status block into two quantities:
- Import =
MAX(W, 0) - Export =
MAX(-W, 0)
The energy counters TotWhImp (import) and TotWhExp (export) live in separate registers anyway — wire those up directly.
Adding registers manually
If you need a register that isn't in either template, or you want to work without one: add a device below the Modbus server via Add Modbus device, and one analogue sensor per value below that (Add analogue sensor).
| Value | Address | Count | Data type | Scaling (SF register) |
|---|---|---|---|---|
| Total active power | 40088 | 1 | int16 (signed!) | 40092 (W_SF) |
| Active power L1 / L2 / L3 | 40089 / 40090 / 40091 | 1 | int16 | 40092 (W_SF) |
| Current L1 / L2 / L3 | 40073 / 40074 / 40075 | 1 | int16 | 40076 (A_SF) |
| Voltage L1 / L2 / L3 | 40078 / 40079 / 40080 | 1 | int16 | 40085 (V_SF) |
| Frequency | 40086 | 1 | int16 | 40087 (Hz_SF) |
| Total import | 40116 | 2 | uint32 (acc32) | 40124 (TotWh_SF) |
| Total export | 40108 | 2 | uint32 (acc32) | 40124 (TotWh_SF) |
Per sensor, set:
- Function code
0x03(Read Holding Registers) - Data type as listed above — the 16-bit values are signed
- Correction:
value = raw × 10^SF, times the conversion to your target unit if needed. Read the current factor from the respective SF register instead of guessing it. - Sentinel filter, or delete the sensor — see Removing values your meter doesn't deliver
Troubleshooting
All sensors stay at 0 / no connection
- Is Modbus enabled on the WattWächter? Check
/api/v1/modbus/status→enabled: true,running: true. - Does the Address field contain an IP address with port (
192.168.178.106:502) and not a.localname? - Did you save the program to the Miniserver after making the change?
- The WattWächter allows a maximum of 2 concurrent Modbus connections. If a test with
modpollor Home Assistant is still running, disconnect it first.
Values were there and are now frozen
A classic sign of a DHCP address change: Loxone holds the last value instead of showing an error. Check the WattWächter's current IP and set up a DHCP reservation.
A sensor reads −327.68 / −3276.8
That is the SunSpec sentinel 0x8000 — your meter does not deliver this OBIS code.
See Removing values your meter doesn't deliver.
The power registers have a second cause: values outside ±327.67 kW do not fit into an int16 and are reported as the sentinel too, rather than being clamped to the maximum. This only affects connections beyond 327 kW.
Values are off by a factor of 10
Then the correction in the sensor no longer matches the device's scale factor —
usually after a firmware update. Read the SF registers (40092 for power) and fix the
factor, or re-import the current template.
More items in the Modbus TCP troubleshooting section.