Frequently Asked Questions (FAQ)
WattWächter does not create a WiFi network for initial setup
In rare cases, the WattWächter may not create a WiFi network on first power-up. In this case, perform a factory reset.
To do this, restart the device 7 times by repeatedly disconnecting and reconnecting the USB cable (leave it plugged in/unplugged for 2–3 seconds each time). The factory reset occurs on the 7th restart.
If this does not work, please contact our support at: support@smartcircuits.de
Entering the PIN on the electricity meter
The network operator's PIN can be entered via the optical interface using a flashlight, for example. There are also smartphone apps that can help:
- Android: StromPIN
- Apple iOS: Stromlampe
Testing the WattWächter without a SmartMeter – Mirror script
To test the transmit and receive electronics without a SmartMeter, a special script can be used. It sends a message via the IR LED that can be received by the phototransistor when holding the WattWächter about 3 cm above a reflective surface (mirror, knife blade, etc.).
Go to "Tools" => "Edit Script", check "Script enable" and paste the following script:
>D
>B
->sensor53 r
>M 1
+1,3,o,0,9600,STROM,1,10,5370696567656C74657374210D0A
1,1-0:1.8.1*255(@1,Total Consumed,KWh,Total_in,3
1,1-0:2.8.1*255(@1,Total Delivered,KWh,Total_out,3
1,1-0:0.0.0*255(@#),Meter Number,,Meter_number,0
#
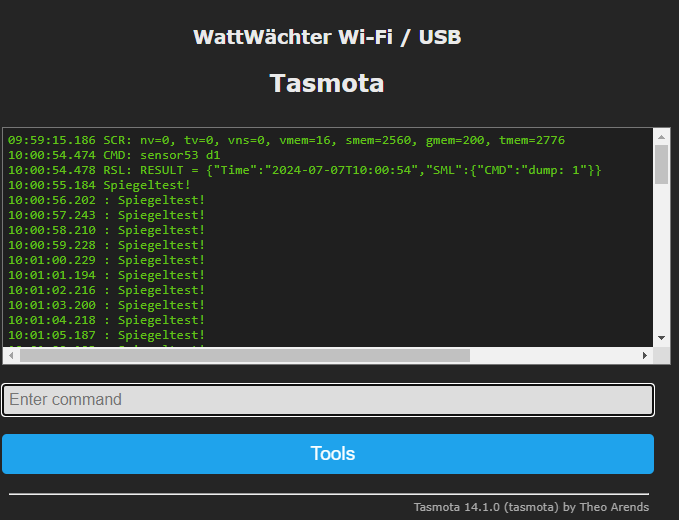
Click "Save", then go to "Console" and enter:
sensor53 d1
Hold the WattWächter about 3 cm above a reflective surface – the text "Spiegeltest!" should appear in the console.
Don't forget to disable dump mode afterwards:
sensor53 d0
Resetting the WattWächter
The WattWächter may become unreachable, e.g. when connecting to a new WiFi network or after a typo in the WiFi password.
The following options are available:
-
Interrupt power supply (Gen.1 and Gen.2): Restart the device 7 times by repeatedly disconnecting and reconnecting the USB cable (leave it plugged in/unplugged for 2–3 seconds each time). The reset occurs on the 7th restart.
-
Press the function button (Gen.2 only): Hold the function button on the housing for approximately 7 seconds.

-
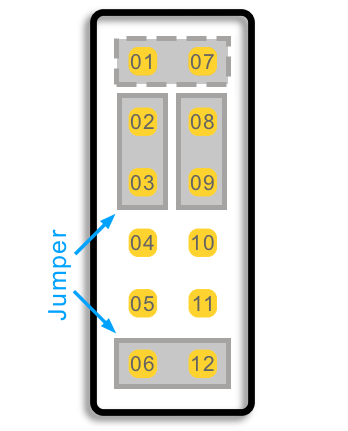
Connect GPIO0 to GND (Gen.1 only): Power on the WattWächter, wait a few seconds, then connect GPIO0 to GND for about 40 seconds. This can be done by placing a jumper on pins 01 and 07 (shown as dashed line in the image).
WattWächter does not show current power
If the WattWächter only shows meter readings for consumption and feed-in (usually without decimal places) and the current power reading is missing, only the reduced data set is being transmitted.
This is usually the case when either the PIN has not been entered or the "Inf" parameter in the meter's menu is set to "Off".
To activate the extended data set, set the "Pin" parameter to "Off" and the "Inf" parameter to "On". Refer to the meter's operating manual for instructions.
Switching a Tasmota smart plug based on a meter value
To switch a Tasmota smart plug when your PV system feeds power into the grid, the script can be adapted.
The following script checks every second whether current power has dropped below -1,000 W. If so, the smart plug is turned on. When power rises above 0 W, it is turned off again.
>D

>B
->sensor53 r

>M 1
+1,3,s,0,9600,eHz
1,77070100010800ff@1000,Total consumption,kWh,total_in,2
1,77070100020800ff@1000,Total feed-in,kWh,total_out,2
1,77070100100700ff@1,Power,W,power_curr,0
#

>S
; If Power < -1000 => turn on smart plug
if sml[3]<-1000 {
    =>WebSend [smart-plug-IP] Power On
}

; If Power > 0 => turn off smart plug
if sml[3]>0 {
    =>WebSend [smart-plug-IP] Power Off
}
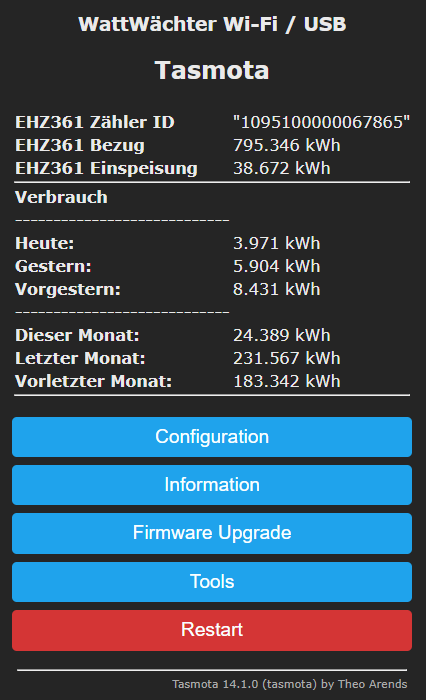
Displaying daily and monthly consumption
Many meters store daily and monthly consumption internally, accessible via the display. Unfortunately, these values are usually not transmitted via the optical interface.
However, you can calculate daily and monthly consumption in the script and display them in the overview:
>D
p:nullUhr=0
p:heute=0
p:gestern=0
p:vorgestern=0
p:month1=0
p:month2=0
p:month3=0
hr=0
dy=0
month=0

>B
->sensor53 r

>S
hr=hours
dy=day

if nullUhr==0
  then
    nullUhr=sml[1]
endif

if chg[hr]>0
  and hr==0
    then
      nullUhr=sml[1]
      vorgestern=gestern
      gestern=heute
      month1=month1+heute

      if chg[dy]>0
        and dy==1
          then
            month3=month2
            month2=month1
            month1=0
      endif

      ;Save p-variables to flash
      svars
endif

heute=sml[1]-nullUhr
month=month1+heute

>M 1
+1,3,o,0,9600,EHZ361
1,1-0:1.8.0*255(@1,Bezug,kWh,bezug,3
1,1-0:2.8.0*255(@1,Einspeisung,kWh,einspeisung,3
1,1-0:0.0.0*255(@#),Zähler ID,,meter_number,0
#

>W
Consumption
----------------------------
Today: {m} %3heute% kWh
Yesterday: {m} %3gestern% kWh
Day before: {m} %3vorgestern% kWh
----------------------------
This month: {m} %3month% kWh
Last month: {m} %3month2% kWh
Month before: {m} %3month3% kWh
Note
This script decodes telegrams from a Hager EHZ361 meter. To adapt it for a different meter, only the decoding section between >M 1 and the closing # needs to be replaced. The calculation routine expects consumed kWh in the first line (sml[1]). If this value is decoded in a different line, the index in the >S section must be adjusted in three places.
Prometheus integration
The WattWächter supports Prometheus integration out of the box. It provides data at the endpoint http://<WattWächter-IP>/metrics that can be scraped by Prometheus.
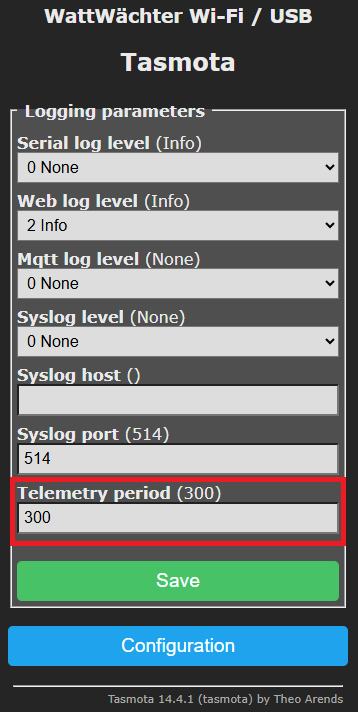
Adjusting the MQTT send interval
By default, data is sent via MQTT every 5 minutes (300 seconds). This can be changed under "Configuration" => "Logging". The relevant parameter is Telemetry period, which can be reduced to as low as 10 seconds.
For even more frequent updates, this can be achieved by adapting the script. Please contact our support for assistance.
Sending script variables via MQTT
To also send script variables (e.g. monthly consumption values) via MQTT, add the following code to the >S block of the script:
if upsecs%tper==0 {
    =>publish stat/%topic%/SENSOR_EHZ361_month %2(month)%
}
SENSOR_EHZ361_month– identifier under which the variable is published to MQTTmonth– the script variable to be sent%2( )%– specifies two decimal places for the value
Assigning a static IP address
A static IP address can be assigned to the WattWächter. Enter the following commands in the console ("Tools" => "Console"):
savedata 1
ipaddress1 192.xxx.yyy.zzz
savedata 0
The IP address must be adapted to match your router's address range.
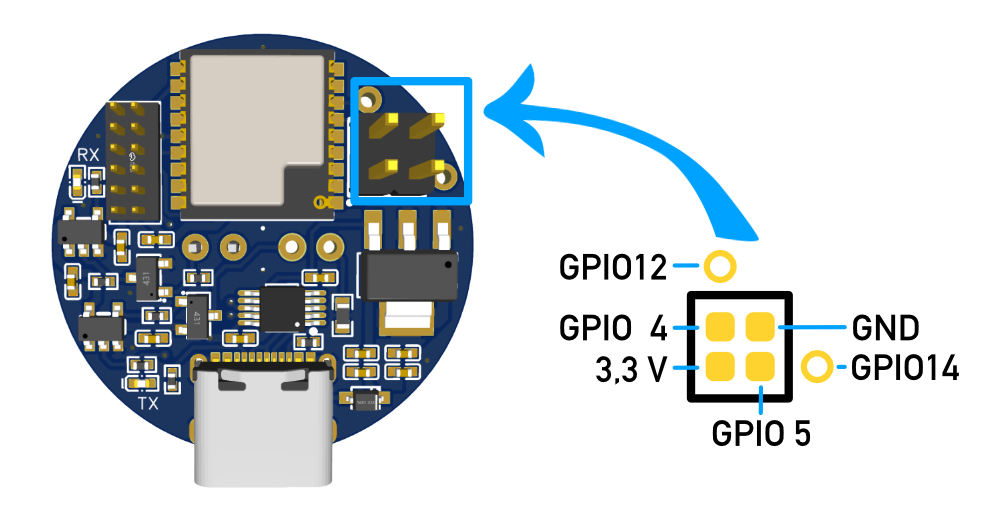
GPIO pin assignment
Gen.1 only
This information is only relevant for the WattWächter WiFi/USB Gen.1.
The pin assignment of the exposed GPIOs on the WattWächter WiFi/USB can be found in the following diagram:
Switching a GPIO based on a meter value
Gen.1 only
This feature is only available on the WattWächter WiFi/USB Gen.1.
To switch a GPIO on the WattWächter based on a meter value (e.g. to control a relay), the script can be adapted accordingly.
The following script checks every second whether the power on phase L1 exceeds 700 W. If so, GPIO4 is turned on. When power drops below 500 W, GPIO4 is turned off again.
>D

>B
->sensor53 r

>BS
; Configure GPIO4 as output
spinm(4 1)

>M 1
+1,3,o,0,9600,OBIS
1,1-0:1.8.0*255(@1,Bezug,kWh,bezug,4
1,1-0:2.8.0*255(@1,Einspeisung,kWh,einspeisung,4
1,1-0:21.7.0*255(@1,Watt_L1,W,watt_l1,0
1,1-0:41.7.0*255(@1,Watt_L2,W,watt_l2,0
1,1-0:61.7.0*255(@1,Watt_L3,W,watt_l3,0
1,1-0:0.0.0*255(@#),Zählernummer,,meter_number,0
#

>S
; If Watt_L1 > 700 => GPIO4 on
if sml[3]>700 {
    spin(4 1)
}

; If Watt_L1 < 500 => GPIO4 off
if sml[3]<500 {
    spin(4 0)
}
Connecting WattWächter TTL to WattWächter WiFi/USB
Gen.1 only
This feature is only available on the WattWächter WiFi/USB Gen.1.
The WattWächter TTL must be connected to the WattWächter WiFi/USB via a 4-wire cable. The wiring diagram is shown below:
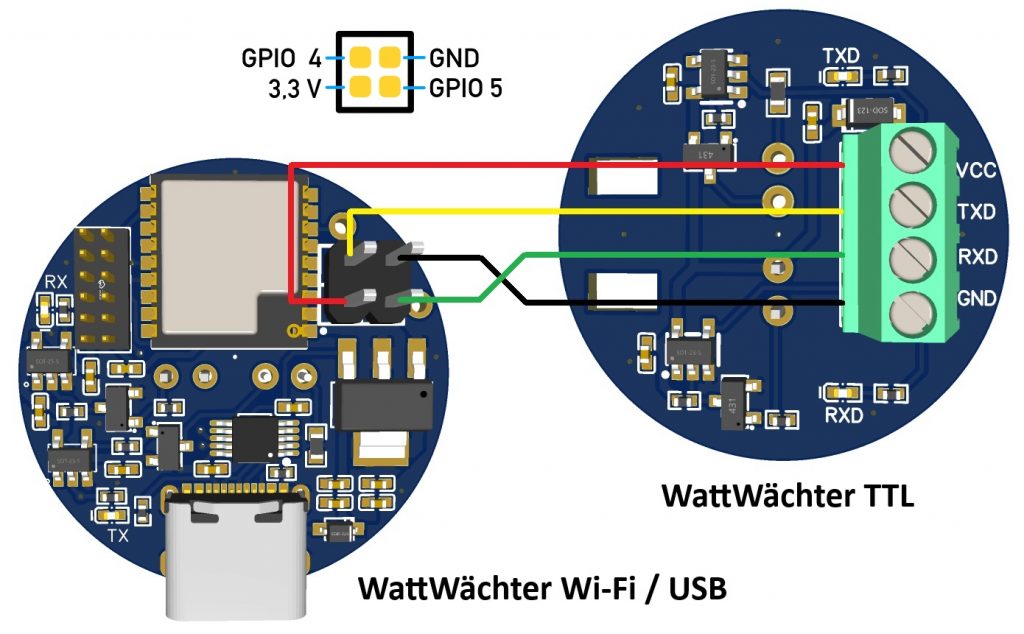
Once both devices are connected, a second sensor must be defined in the WattWächter WiFi/USB script. According to the wiring diagram above, use GPIO 5 for RX and GPIO 4 for TX.
Example script for two Hager EHZ363 meters:
>D
>B
->sensor53 r
>M 2
+1,3,s,0,9600,Meter 1,1
+2,5,s,0,9600,Meter 2,4
1,77070100100700ff@1,Power,W,P1,0
1,77070100010800ff@1000,Consumption,kWh,B1,2
1,77070100020800ff@1000,Feed-in,kWh,E1,2
2,=h===================
2,77070100100700ff@1,Power,W,P2,0
2,77070100010800ff@1000,Consumption,kWh,B2,2
2,77070100020800ff@1000,Feed-in,kWh,E2,2
#